Finite Element Method for Slope Stability Analysis
Introduction
The finite element method (FEM) provides a powerful numerical technique for slope stability analysis that overcomes many fundamental limitations of traditional limit equilibrium methods. While limit equilibrium approaches require the engineer to assume a failure surface geometry and then check whether equilibrium conditions are satisfied, FEM allows potential failure mechanisms to emerge naturally through rigorous stress analysis and progressive failure development (Griffiths & Lane, 1999; Duncan, 1996). Rather than imposing kinematic constraints through assumed failure surfaces, FEM solves the complete stress-strain problem throughout the slope domain. The method can capture the complex stress redistribution that occurs as soil elements progressively reach failure, leading to the natural development of failure zones without prior assumptions about their geometry or location. Perhaps most importantly, FEM uses realistic stress-strain constitutive models that can capture the actual behavior of soil materials, including nonlinear elastic behavior, plastic yielding, strain softening, and progressive failure. This provides a much more accurate representation of soil response compared to the rigid-perfectly plastic assumptions typically used in limit equilibrium methods.
Run FEM interactively
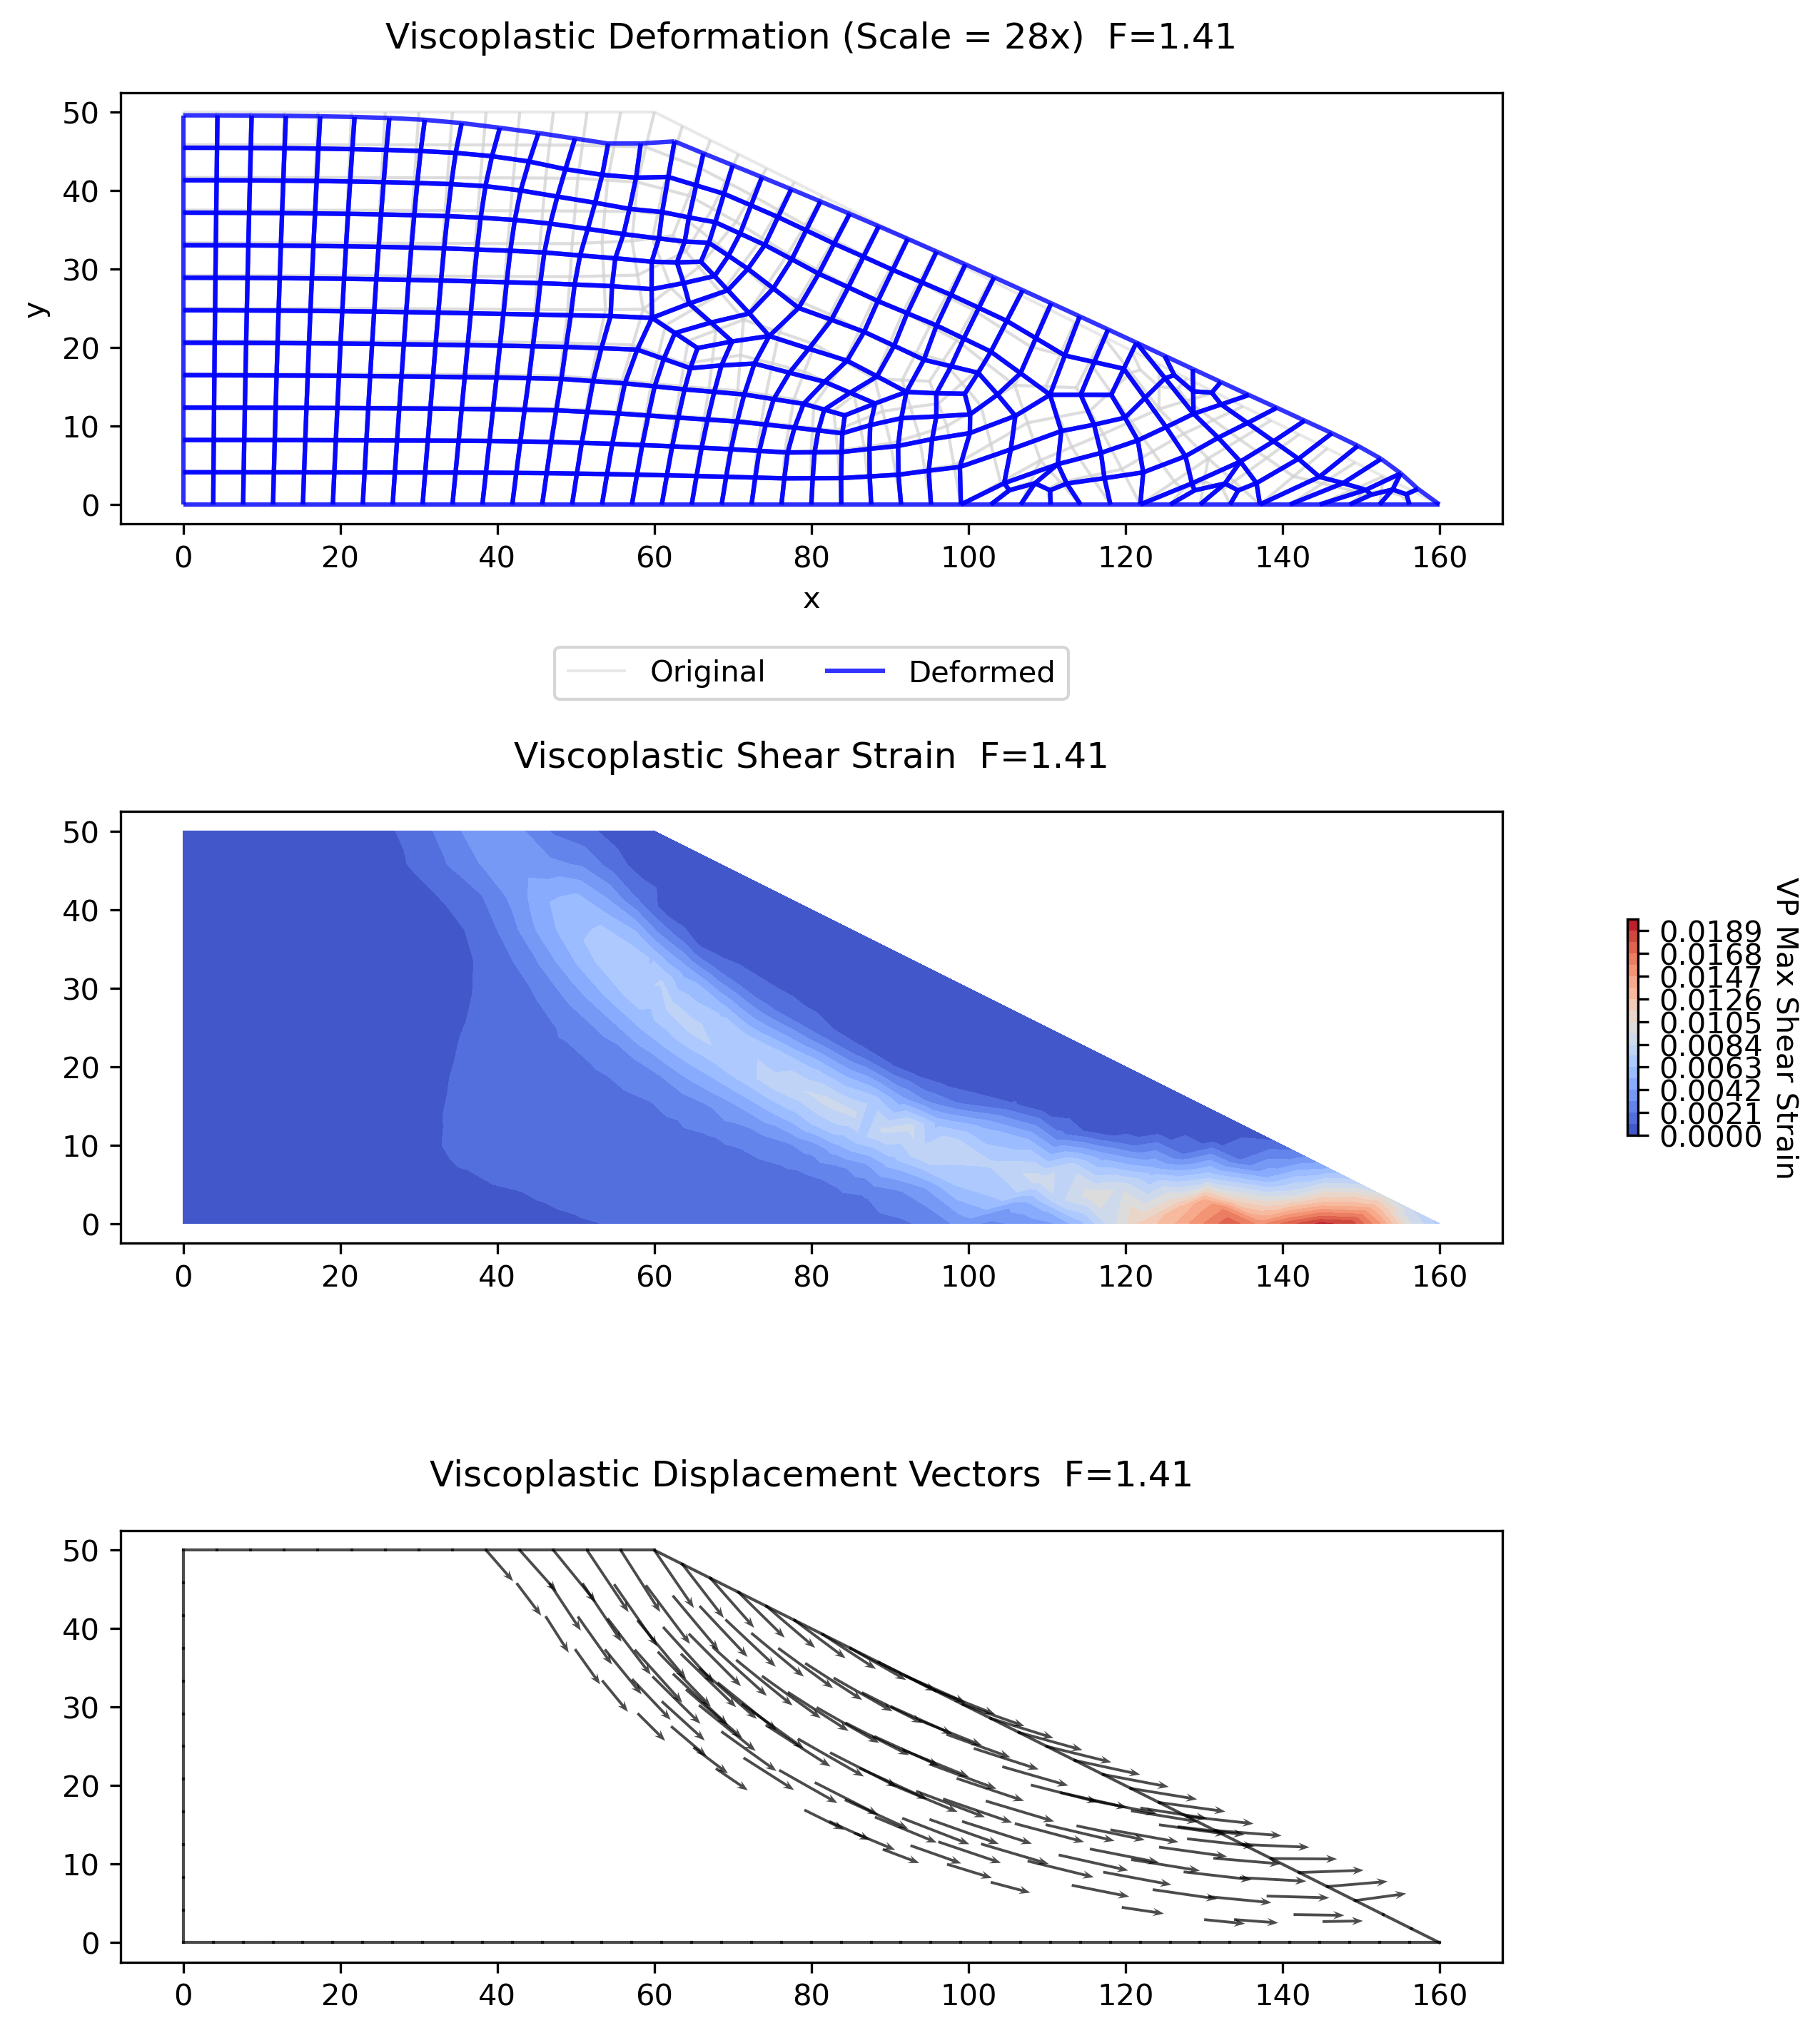
The finite-element / SSRM analysis described here can be run point-and-click in XSlope Studio: build a mesh, run a single trial or an SSRM factor-of-safety search (with cancel), and view deformation and shear-strain results. See Studio → Running Analyses.
Equilibrium Equations
The foundation of finite element slope stability analysis rests on the fundamental equilibrium equations that govern the static behavior of continuum mechanics. In two dimensions, these equilibrium equations express the requirement that forces acting on any infinitesimal element of soil must be in balance:
\(\dfrac{\partial \sigma_x}{\partial x} + \dfrac{\partial \tau_{xy}}{\partial y} + b_x = 0\)
\(\dfrac{\partial \tau_{xy}}{\partial x} + \dfrac{\partial \sigma_y}{\partial y} + b_y = 0\)
Here, \(\sigma_x\) and \(\sigma_y\) represent the normal stresses acting in the x and y directions respectively, while \(\tau_{xy}\) denotes the shear stress. The body force terms \(b_x\) and \(b_y\) account for forces distributed throughout the volume of the material, with gravity being the most common example where \(b_x = 0\) and \(b_y = -\gamma\), where \(\gamma\) is the unit weight of the soil.
These equations must be satisfied at every point within the slope domain for the system to be in static equilibrium. The challenge in slope stability analysis arises because soil materials exhibit nonlinear, inelastic behavior that violates these equilibrium conditions when failure occurs, leading to the progressive development of failure zones.
Stress-Strain Relations
The constitutive behavior of soil in finite element slope stability analysis is typically modeled using an elastic-perfectly plastic framework that combines linear elastic behavior with Mohr-Coulomb plasticity. This approach recognizes that soil behaves elastically under small stress changes but exhibits permanent deformation once failure is reached.
During the elastic phase, before any yielding occurs, the relationship between stress and strain follows Hooke's law expressed in matrix form:
\(\{\sigma\} = [D_e] \{\varepsilon\}\)
The elastic constitutive matrix \([D_e]\) for plane strain conditions, which is most appropriate for slope stability problems, takes the form:
\([D_e] = \dfrac{E}{(1+\nu)(1-2\nu)} \begin{bmatrix} 1-\nu & \nu & 0 \\ \nu & 1-\nu & 0 \\ 0 & 0 & \dfrac{1-2\nu}{2} \end{bmatrix}\)
This formulation requires several fundamental material properties that must be determined through laboratory testing or empirical correlations. Young's modulus \(E\) governs the stiffness of the soil under loading, while Poisson's ratio \(\nu\) controls the relationship between axial and lateral strains. For slope stability analysis, additional strength parameters are critical: the cohesion \(c\) and friction angle \(\phi\) define the failure envelope, while the unit weight \(\gamma\) determines the gravitational body forces. The coefficient of earth pressure at rest \(K_0\) is often needed to establish initial stress conditions, particularly for natural slopes that have developed under gravitational loading over geological time.
Typical Elastic Parameters for Finite Element Analysis
The following table provides typical ranges of elastic parameters for common soil types under drained conditions. These values should be used as initial estimates and refined based on site-specific testing when available.
| Soil Type | Young's Modulus \(E\) [kPa] | Young's Modulus \(E\) [psf] | Poisson's Ratio \(\nu\) | Notes |
|---|---|---|---|---|
| Soft Clay | 2,000 - 15,000 | 41,800 - 313,000 | 0.40 - 0.50 | Use lower E values for very soft clays |
| Medium Clay | 15,000 - 50,000 | 313,000 - 1,044,000 | 0.35 - 0.45 | Plasticity index affects stiffness |
| Stiff Clay | 50,000 - 200,000 | 1,044,000 - 4,175,000 | 0.20 - 0.40 | Overconsolidated clays have higher E |
| Loose Sand | 10,000 - 25,000 | 209,000 - 522,000 | 0.25 - 0.35 | Depends on relative density |
| Medium Sand | 25,000 - 75,000 | 522,000 - 1,565,000 | 0.30 - 0.40 | Well-graded sands toward upper range |
| Dense Sand | 75,000 - 200,000 | 1,565,000 - 4,175,000 | 0.25 - 0.35 | Angular particles give higher stiffness |
| Loose Silt | 5,000 - 20,000 | 104,000 - 418,000 | 0.30 - 0.45 | Non-plastic silts toward lower ν |
| Dense Silt | 20,000 - 100,000 | 418,000 - 2,088,000 | 0.25 - 0.40 | Cementation increases stiffness |
| Gravel | 100,000 - 500,000 | 2,088,000 - 10,440,000 | 0.15 - 0.30 | Well-graded, dense materials |
| Rock Fill | 50,000 - 300,000 | 1,044,000 - 6,260,000 | 0.20 - 0.35 | Depends on gradation and compaction |
| Soft Rock | 1,000,000 - 10,000,000 | 20,880,000 - 208,800,000 | 0.15 - 0.30 | Weathered or fractured rock |
When working in metric units, E should always be entered in \(kPa\) to be consistent with the unit weights and cohesion values. For English units, E should always be entered in \(psf\).
For undrained shearing conditions, the undrained modulus can be determined through several approaches:
-
Direct Laboratory Testing: Unconsolidated undrained (UU) triaxial tests or unconfined compression tests provide direct measurement of \(E_u\). The initial tangent modulus from stress-strain curves gives the most representative value.
-
Empirical Correlations: For clays, \(E_u\) can be estimated from undrained shear strength using:
\(E_u = (150-1500) \times S_u\)
where \(S_u\) is the undrained shear strength. Use lower multipliers (150-400) for soft clays and higher values (400-1500) for stiff clays.
-
Relationship to Drained Modulus: For saturated clays, the undrained modulus is typically higher than the drained modulus:
\(E_u = \dfrac{E'(1-2\nu')}{(1-2\nu_u)(1+\nu')} \times \dfrac{(1+\nu_u)}{(1-\nu')}\)
where \(E'\) and \(\nu'\) are drained parameters, and \(\nu_u \approx 0.5\) for undrained conditions. This often simplifies to \(E_u \approx (1.2-2.0) \times E'\) for typical clay parameters.
-
Laboratory vs. Field Values: Laboratory-derived moduli are often higher than field values due to sample disturbance and scale effects. Field moduli (from pressuremeter, plate load tests) may be more representative.
-
Empirical Correlations: When direct testing is unavailable, Young's modulus can be estimated from standard penetration test (SPT) or cone penetration test (CPT) data using published correlations.
Note
In finite element slope stability analysis using the Shear Strength Reduction Method (SSRM), the elastic modulus E primarily affects the magnitude of computed deformations but has minimal impact on the calculated factor of safety. The factor of safety is governed by the strength parameters (cohesion c and friction angle φ) rather than the elastic response. Therefore, approximate values of E are often sufficient for slope stability calculations, and extensive effort to precisely determine elastic moduli may not be warranted unless deformation predictions are also required.
Mohr-Coulomb Failure Criterion
The constitutive behavior described above is valid only while the soil remains in the elastic domain. Once the stress state reaches the failure envelope, plastic yielding occurs and the material behavior changes fundamentally. The Mohr-Coulomb failure criterion forms the theoretical foundation for determining when this failure occurs in finite element slope stability analysis.
This criterion, developed from extensive experimental observations of soil behavior, recognizes that soil failure is fundamentally a shear phenomenon that depends on both the normal stress acting on the failure plane and the inherent strength properties of the material. The following figure illustrates the Mohr-Coulomb failure envelope in stress space, which defines the boundary between stable and unstable states for a given soil material:
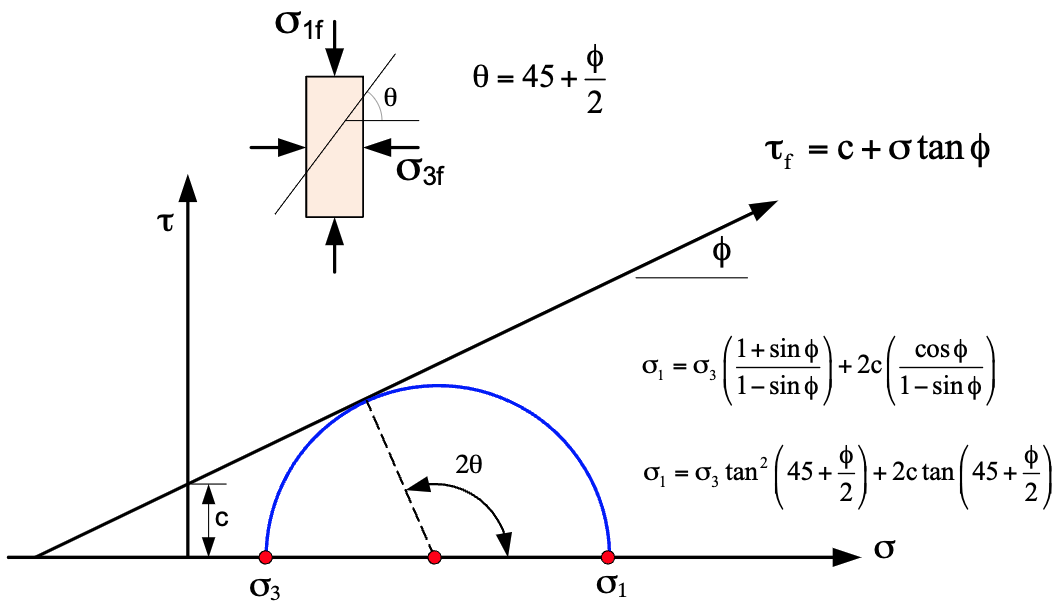
The line defined by the Mohr-Coulomb criterion represents the maximum shear stress that can be sustained by the soil at a given effective normal stress. The slope of this line is determined by the angle of internal friction \(\phi\), while the intercept on the shear stress axis is defined by the cohesion \(c\) of the soil. The basic form of the Mohr-Coulomb criterion expresses the relationship between shear strength and normal stress on any potential failure plane:
\(\tau_f = c + \sigma \tan \phi\)
In this formulation, \(\tau_f\) represents the shear strength available to resist failure, \(c\) is the cohesion representing the portion of strength that is independent of normal stress, \(\sigma\) is the normal stress acting perpendicular to the failure plane, and \(\phi\) is the angle of internal friction that governs how strength increases with normal stress. When written in terms of effective stresses, the criterion becomes:
\(\tau_f = c + \sigma' \tan \phi\)
\(\tau_f = c + (\sigma - u) \tan \phi\)
where \(\sigma'\) is the effective normal stress, defined as the total normal stress minus pore water pressure (u). This effective stress formulation is critical for understanding how changes in pore water pressure, such as those caused by rainfall or groundwater fluctuations, can significantly affect slope stability.
Yield Function for Finite Element Implementation:
For computational implementation in finite element analysis, it is more convenient to express the failure criterion in terms of principal stresses. This transformation yields the yield function:
\(f(\sigma_1', \sigma_3') = \dfrac{\sigma_1' - \sigma_3'}{2} - \left(\dfrac{\sigma_1' + \sigma_3'}{2} \sin \phi + c \cos \phi\right) = 0\)
where \(\sigma_1'\) and \(\sigma_3'\) are the major and minor principal effective stresses respectively. This yield function defines the boundary between elastic and plastic behavior in the soil:
- When \(f < 0\): stress state lies within the elastic domain
- When \(f = 0\): stress state lies exactly on the yield surface (incipient yielding)
- When \(f > 0\): stress state has exceeded the yield strength (plastic deformation required)
The yield function can be visualized in principal stress space, where the failure envelope is a hyperbolic surface that separates stable and unstable states:
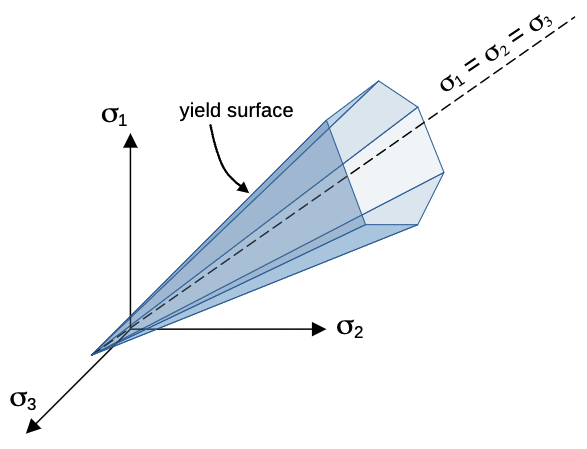
This principal stress formulation allows direct evaluation of the yield function using the principal stresses computed at each integration point within the finite element mesh. The evaluation of principal stresses \(\sigma_1'\) and \(\sigma_3'\) from the general stress tensor requires solution of the eigenvalue problem, which can be computationally intensive but is essential for accurate yield detection.
The implementation of this failure criterion within the finite element framework will be discussed after the basic finite element formulation is presented.
Elastic-only materials. A material can be marked pure linear-elastic on the mat sheet by setting its
option column to elastic (template version 16): none of its elements are ever checked against the yield
criterion above, so they cannot yield regardless of stress state — the elastic constitutive relation \([D_e]\) from
the previous section is the complete stress-strain law for them, for every strength reduction factor in an SSRM
run. Only \(\gamma\)/\(\gamma_{sat}\), \(E\), and \(\nu\) are meaningful for such a material; its strength columns are
ignored. solve_fem() and solve_ssrm() take the affected material names through the elastic_materials
argument, auto-wired from the template's option column when left unset. See
Worksheet: mat in the Input Template for the full column semantics.
Curved Failure Envelopes
Two of XSLOPE's strength options are not straight lines in \(\tau\)–\(\sigma'_n\) space: the power curve (pow) and the
generalized Hoek-Brown criterion (hb), both described in the
LEM overview. The FEM does not carry a separate yield function for
either one. Instead it keeps the Mohr-Coulomb machinery above and re-linearizes the curve into an instantaneous
tangent \((c_i, \phi_i)\) at every Gauss point on every viscoplastic iteration, using that iteration's own stress
state as the linearization point. Because the viscoplastic algorithm is already iterating the stress field to
convergence, the tangent converges along with it, and at equilibrium every yielding Gauss point sits on the true
curved envelope at its own normal stress — no separate outer loop is needed.
Where the curve is linearized matters. For the power curve the abscissa is the in-plane Mohr-circle centre,
\(s' = -(\sigma_x + \sigma_y)/2\) (compression-positive): the pow envelope is mild enough that the centre is a
stable, fully vectorizable choice. Hoek-Brown is far more sharply curved, and it uses the normal stress on the
failure plane,
evaluated from the previous iteration's reduced tangent. That expression is exactly the point at which a Mohr circle touches its tangent line, so it closes as a fixed point inside the viscoplastic loop at no extra cost: at convergence the Mohr circle, the tangent line, and the reduced envelope all meet at the same \(\sigma_n\). It is also the abscissa the LEM uses (the slice-base normal stress), so both solvers linearize the same curve in the same place.
Strength reduction needs care here. Dividing the shear strength by \(F\) divides both the instantaneous cohesion and \(\tan\phi_i\) by \(F\), so it is the tangent that gets reduced, once per iteration, after it is computed. The curve's own constants are never reduced — \(\sigma_{ci}/F\) is a different envelope entirely, because of the exponent \(a\), and would silently give the wrong factor of safety.
The reduction also explains why the minor principal stress \(\sigma'_3\) — Balmer's own parameter, and the obvious candidate — is not used as the abscissa. Balmer's \(\sigma'_3 \rightarrow\) tangency mapping is derived for the unreduced envelope, so it names the right point only at \(F = 1\). Under strength reduction the Mohr circle is roughly \(F\) times smaller and touches the reduced envelope at a much lower normal stress; because the Hoek-Brown envelope is concave, a tangent taken at the stale abscissa lies strictly above the true envelope, giving a one-sided, over-strong yield surface that inflates the factor of safety.
Verification
The Hoek-Brown implementation is verified end-to-end against Example 1 of Hammah, R.E., Yacoub, T.E., Corkum, B., & Curran, J.H. (2005), The shear strength reduction method for the generalized Hoek-Brown criterion, Proc. 40th U.S. Symposium on Rock Mechanics (ARMA/USRMS), Paper 05-810 — a 10 m, 45° slope in a weak rock mass (\(\sigma_{ci}\) = 30 MPa, GSI = 5, \(m_i\) = 2, \(D\) = 0). XSLOPE returns Spencer 1.152 and Bishop 1.150 against the paper's 1.152 and 1.153, and SSRM 1.158 against its published SSRM value of 1.15. The derived constants (\(m_b\) = 0.0672, \(s\) = 2.605e-5, \(a\) = 0.6192) reproduce the paper's Table 1 exactly.
Matric suction (apparent cohesion above the water table)
By default the finite-element solver clamps pore pressure to \(u = \max(0, u)\) at every Gauss point before the yield check (the "suction is conservatively ignored" behavior described under Pore Pressure Options), so the negative pore pressures that exist above the water table add no strength. Where matric suction is a first-order effect — an unsaturated cut slope, for instance — a per-material unsaturated friction angle \(\phi^b\) turns that credit on, using the same Fredlund extended Mohr-Coulomb criterion the limit-equilibrium solver uses:
\(\tau_f = c' + (\sigma_n - u_a)\tan\phi' + (u_a - u_w)\tan\phi^b\)
With the pore-air pressure \(u_a = 0\) (the standard slope-stability idealization), the last term becomes an apparent cohesion
\(c_{suction} = \min(s,\; s_{cap})\,\tan\phi^b, \qquad s = \max(0,\; -u_w)\)
where \(s\) is the suction — the magnitude of the negative pore pressure — at the Gauss point, and \(s_{cap}\) is an optional ceiling on the credited suction. This apparent cohesion is added to the effective cohesion \(c'\) in the Mohr-Coulomb yield function. The effective-normal-stress term keeps the ordinary clamped \(u \ge 0\), so the effective stress at the Gauss point is unchanged and only the cohesive intercept of the yield surface picks up the extra strength. Below the water table \(u_w \ge 0\), so \(s = 0\) and the term vanishes — the material yields exactly as it always has.
The suction is drawn from the material's own pore-pressure source and is credited only for the effective-stress
strength options (mc, pow, hb) combined with a signed pore-pressure source, u = piezo or u = seep — the
only sources that carry a negative pressure above the water table. It is inert (and the columns are greyed on the
mat sheet) for cp and elastic materials and for the none and ru sources, exactly as in the
limit-equilibrium solver.
Reduction under strength reduction. In an SSRM solve the apparent cohesion is reduced by the trial strength-reduction factor \(F\) alongside \(c'\) and \(\tan\phi'\):
\(c_{suction,\,r} = \dfrac{\min(s,\; s_{cap})\,\tan\phi^b}{F}\)
so the suction credit scales as \(1/F\) and enters the reduced envelope on the same footing as the effective cohesion (compare \(c_r = c'/F\) and \(\tan\phi_r = \tan\phi'/F\) in the SSRM methodology). This mirrors the limit-equilibrium treatment, where the suction term sits inside the \(F\)-divided numerator of the developed strength. It also distinguishes the suction term from the Rankine tension cutoff, which caps a stress and is therefore not reduced by \(F\).
Off by default. \(\phi^b\) is blank for every material unless it is set, so no suction strength is credited and
the solve is identical to the pre-suction solver. The feature is controlled by the same two material columns as the
limit-equilibrium solver — phi_b and s_cap on the
mat worksheet — and is auto-wired into solve_fem() and solve_ssrm()
from the template. Their suction_phi_b / suction_cap arguments override the file the same way
elastic_materials and the tensile cutoff are, so a script can turn the credit on, force it off, or override a cap
without editing the input file.
Cap the suction on a piezometric source
A piezometric line's hydrostatic head grows negative without bound above the line, so the higher a Gauss point
sits above it the larger the (unphysical) suction and the larger the credited apparent cohesion. Always set
s_cap when using phi_b with u = piezo. With u = seep the finite-element seepage field is self-bounded
by the unsaturated-flow physics, so a cap there is a useful backstop rather than a hard requirement.
Finite Element Formulation
Discretization
The transformation from continuous domain to discrete finite element system begins with dividing the slope domain into a collection of simple geometric elements, typically triangles or quadrilaterals.
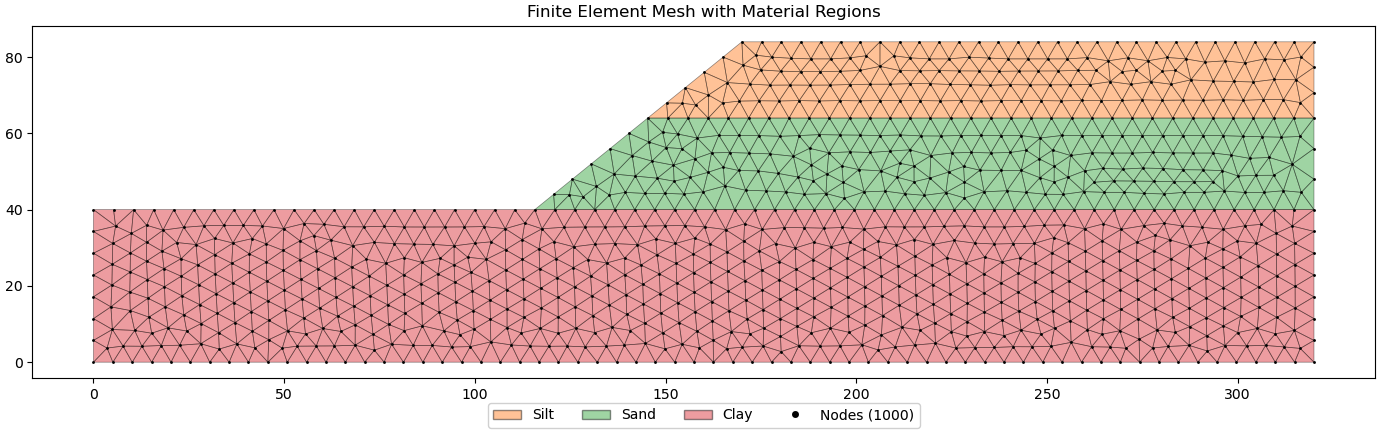
This discretization process is fundamental to the finite element method because it allows the complex, continuous displacement field throughout the slope to be approximated using simple polynomial functions defined over each element. The element types supported in XSLOPE include linear triangular elements, quadratic triangular elements, linear quadrilateral elements, and quadratic quadrilateral elements. Each element type has its own set of shape functions that define how displacements vary within the element based on the nodal values.
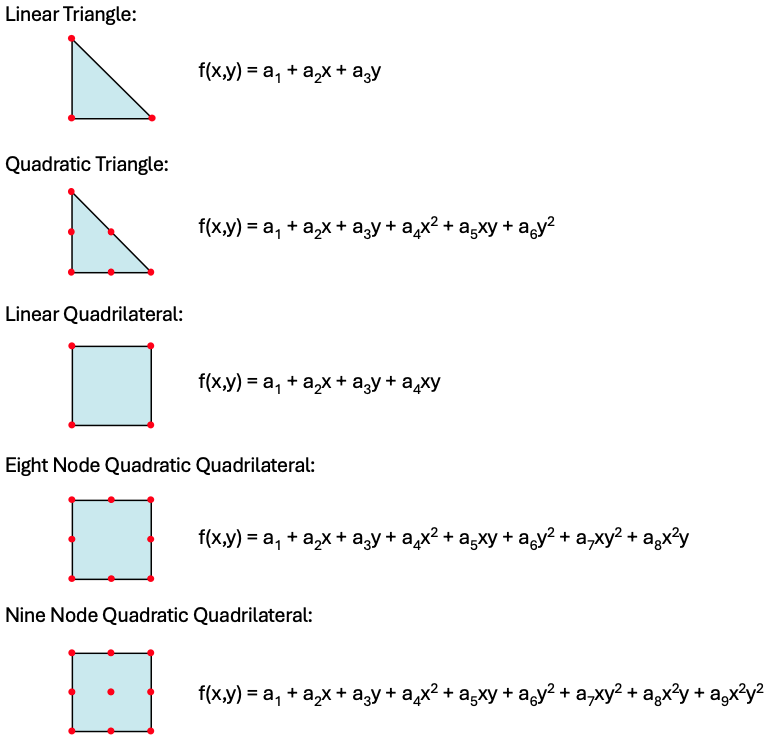
Within each element, the displacement field is interpolated from the nodal displacement values using shape functions. For a typical two-dimensional element, the horizontal and vertical displacements at any point within the element are expressed as:
\(u = [N] \{u_e\}\)
\(v = [N] \{v_e\}\)
The shape function matrix \([N]\) contains the interpolation functions that define how displacements vary spatially within the element, while \(\{u_e\}\) and \(\{v_e\}\) are vectors containing the nodal displacement values. For linear triangular elements, the shape functions are simply the area coordinates that ensure displacement compatibility between adjacent elements and provide a linear variation of displacement within each element.
The choice of element type significantly impacts both accuracy and computational efficiency. Triangular elements with linear shape functions are particularly well-suited for slope stability problems because they can easily conform to irregular slope geometries and provide adequate accuracy for capturing the stress distributions that govern failure development. The linear displacement variation within each element leads to constant strain and stress fields, which is appropriate for modeling the elastic-perfectly plastic soil behavior typically assumed in slope stability analysis. However, linear triangles are susceptible to volumetric locking — an artificial stiffness that can significantly overestimate the factor of safety, particularly for narrow elements or materials approaching incompressibility (see Element Type Selection and Volumetric Locking below). The tools for building finite element meshes in XSLOPE are described in the Automated Mesh Generation page.
Element Stiffness Matrix
The element stiffness matrix represents the fundamental relationship between nodal forces and nodal displacements for each finite element. This matrix is derived through application of the principle of virtual work, which states that for a system in equilibrium, the virtual work done by external forces must equal the virtual work done by internal stresses for any kinematically admissible virtual displacement field. The mathematical expression for the element stiffness matrix emerges from this principle as:
\([K_e] = \int_{A_e} [B]^T [D_e] [B] \, dA\)
This elegant formulation embodies the essential physics of the problem. The strain-displacement matrix \([B]\) transforms nodal displacements into strains throughout the element, while the constitutive matrix \([D_e]\) relates these strains to stresses according to the material's stress-strain behavior. The integration over the element area \(A_e\) ensures that the stiffness contribution from every point within the element is properly accounted for.
For the commonly used linear triangular elements, the strain-displacement matrix takes the specific form:
\([B] = \dfrac{1}{2A} \begin{bmatrix} b_1 & 0 & b_2 & 0 & b_3 & 0 \\ 0 & c_1 & 0 & c_2 & 0 & c_3 \\ c_1 & b_1 & c_2 & b_2 & c_3 & b_3 \end{bmatrix}\)
The coefficients \(b_i\) and \(c_i\) are geometric constants determined by the nodal coordinates of the triangle, and \(A\) represents the triangle area. This matrix remains constant throughout the element because of the linear nature of the shape functions, which simplifies the integration process and leads to computational efficiency.
Global System Assembly
The transition from individual element stiffness matrices to the global system of equations represents one of the most elegant aspects of the finite element method. Each element contributes to the overall structural behavior according to its connectivity with other elements, creating a sparse but symmetric global stiffness matrix that captures the mechanical interaction throughout the entire slope domain.
The global system of equations takes the familiar form:
\([K] \{U\} = \{F\}\)
The global stiffness matrix \([K]\) is assembled by systematically adding each element's stiffness contribution to the appropriate locations corresponding to the degrees of freedom associated with that element's nodes. This assembly process ensures displacement compatibility between adjacent elements and force equilibrium at every node in the mesh.
The global displacement vector \(\{U\}\) contains the unknown nodal displacements for the entire mesh, while the global force vector \(\{F\}\) represents the applied loads including both external forces and body forces due to gravity. The sparsity of the global stiffness matrix, where most entries are zero due to the local connectivity of finite elements, allows efficient solution algorithms to be employed even for large-scale slope stability problems.
The solution of this global system provides the displacement field throughout the slope under the applied loading conditions. From these displacements, the strain and stress fields can be computed at every point in the domain, enabling assessment of the proximity to failure according to the chosen yield criterion.
Boundary Conditions
The proper specification of boundary conditions is crucial for obtaining physically meaningful solutions in finite element slope stability analysis. Boundary conditions define how the slope interacts with its surroundings and constrain the displacement field to reflect realistic physical constraints. The choice of boundary conditions significantly affects both the stress distribution within the slope and the computed factor of safety.
Displacement Boundary Conditions
Displacement boundary conditions are applied where the motion of the soil mass is constrained by physical limitations or where the model boundaries must represent the behavior of the extended soil mass beyond the computational domain.
Fixed supports represent locations where both horizontal and vertical displacements are completely prevented, typically expressed as \(u = 0\) and \(v = 0\). These conditions are most commonly applied at the base of the finite element model when the analysis extends to sufficient depth that the displacement of deep soil layers has negligible effect on slope stability. The depth required for this assumption depends on the slope geometry and soil properties, but generally the model should extend at least one slope height below the toe and preferably to bedrock or very stiff soil layers.
Roller supports constrain displacement in only one direction while allowing free movement in the perpendicular direction. Along vertical side boundaries, horizontal displacement is typically prevented (\(u = 0\)) while vertical movement is allowed, reflecting the assumption that the slope extends laterally beyond the model boundaries with similar geometry and loading conditions. At the model base, vertical displacement may be prevented (\(v = 0\)) while allowing horizontal movement, which is appropriate when the analysis does not extend to truly fixed boundary conditions.
Free boundaries occur along the ground surface and slope face where no external constraints are applied. These boundaries represent the natural boundary condition of zero traction, meaning that no external forces act normal or tangential to these surfaces except for applied loads such as surcharge loads or foundation pressures.
For slope stability analysis, the most common displacement boundary conditions are fixed supports at the base of the model, roller supports (free movement in the vertical direction) along the left and right vertical boundaries, and free boundaries along the slope face and ground surface. These conditions ensure that the model accurately reflects the physical constraints of the slope while allowing for realistic stress distributions and potential failure mechanisms to develop. These displacement boundary conditions are automatically applied in XSLOPE.
Force Boundary Conditions
Force boundary conditions specify the external loads acting on the slope. In XSLOPE, force boundary conditions correspond to distributed loads which are defined in the input template as line loads with a sequence of coordinates and corresponding load values (force per unit length). These can represent:
- Traffic loads (vehicles, equipment)
- Structural loads (buildings, foundations)
- Hydrostatic pressure (water on slope face)
The distributed loads in the XSLOPE input template can be used either for limit equilibrium analysis or finite element analysis. For limit equilibrium analysis, each distributed load is converted to a resultant force applied at the top of each slice. The total load on each slice is calculated by integrating the distributed load over the slice width.
For finite element analysis, the same distributed loads are converted to equivalent nodal forces using consistent edge integration of the element shape functions, \(f_i = \int N_i\, p\, d\Gamma\) (not tributary-length lumping; on a quadratic edge this gives the 1/6–2/3–1/6 corner–midside–corner split). For a linear load distribution between two adjacent nodes with load intensities \(q_1\) and \(q_2\) separated by distance \(L\), this integration gives the equivalent nodal forces perpendicular to the ground surface:
\(F_1 = \frac{L}{6}(2q_1 + q_2)\)
\(F_2 = \frac{L}{6}(q_1 + 2q_2)\)
Since distributed loads always act perpendicular to the ground surface, these forces must be decomposed into horizontal and vertical components at each node. For a ground surface segment with slope angle \(\beta\) (measured from horizontal), the nodal force components are:
\(F_{1x} = -F_1 \sin \beta\)
\(F_{1y} = -F_1 \cos \beta\)
\(F_{2x} = -F_2 \sin \beta\)
\(F_{2y} = -F_2 \cos \beta\)
where the negative signs indicate that the loads act downward and into the slope (typical for traffic or structural loads). The slope angle \(\beta\) is calculated from the coordinates of adjacent nodes along the ground surface. For a given node on the ground surface, the total resultant force is the sum of the contributions of the distributed load on both the left and right sides of the node.
Body Forces
Body forces act throughout the volume of soil elements, primarily gravitational forces (self-weight of soil). For gravitational loading, the body force components are:
\(b_x = 0\)
\(b_y = -\gamma\)
where \(\gamma\) is the unit weight of the soil. These body forces are incorporated into the equilibrium equations:
\(\dfrac{\partial \sigma_x}{\partial x} + \dfrac{\partial \tau_{xy}}{\partial y} + b_x = 0\)
\(\dfrac{\partial \tau_{xy}}{\partial x} + \dfrac{\partial \sigma_y}{\partial y} + b_y = 0\)
In the finite element formulation, body forces are converted to equivalent nodal forces using:
\(\{F\}_b = \sum_{e=1}^{N_{elem}} \int_{A_e} [N]^T \{b\} \, dA\)
where \([N]\) are the shape functions and the integration is performed over each element area \(A_e\), then summed over all elements in the mesh. This integration distributes the self-weight of the soil to the nodes of each element, ensuring that the gravitational loading is properly represented throughout the slope domain.
Implementation of Boundary Conditions
The boundary conditions described above must be incorporated into the global system of equations \([K]{U} = {F}\) to obtain a solvable system. The implementation of boundary conditions fundamentally modifies both the stiffness matrix and force vector.
Displacement Boundary Conditions:
For prescribed displacements (such as u = 0 or v = 0), the most common implementation approach is the penalty method or direct modification:
-
Direct Modification Method:
- For a node with prescribed displacement \(U_i = 0\), replace row i of the stiffness matrix with zeros except for the diagonal term, which is set to a large number
- Set the corresponding force term \(F_i = 0\)
- This forces the solution to satisfy the constraint \(U_i = 0\) -
Example: For a node at the base with both u = 0 and v = 0:
\(\begin{bmatrix} K_{11} & K_{12} & \cdots \\ 0 & 1 \times 10^{12} & 0 & \cdots \\ 0 & 0 & 1 \times 10^{12} & \cdots \\ \vdots & \vdots & \vdots & \ddots \end{bmatrix} \begin{bmatrix} U_1 \\ 0 \\ 0 \\ \vdots \end{bmatrix} = \begin{bmatrix} F_1 \\ 0 \\ 0 \\ \vdots \end{bmatrix}\)
Force Boundary Conditions:
Applied forces and distributed loads are incorporated directly into the global force vector {F} through the integration processes described above. The stiffness matrix [K] remains unchanged for force boundary conditions.
Automatic Boundary Condition Assignment in XSLOPE
XSLOPE automatically assigns displacement boundary conditions in the build_fem_data() function based on the geometry of the mesh. The user does not need to specify boundary conditions manually — they are determined entirely from the node coordinates using the following rules applied in order:
-
All nodes start as free (no displacement constraints). The ground surface, slope face, and any internal nodes are unconstrained by default, representing the natural zero-traction boundary condition.
-
Fixed supports at the base. All nodes at the global minimum \(y\)-coordinate are assigned fixed boundary conditions (\(u = 0\), \(v = 0\)). These nodes are identified by comparing each node's \(y\)-coordinate to the minimum value in the mesh within a small numerical tolerance (\(10^{-6}\)). This represents rigid bedrock or a sufficiently deep boundary where displacements are negligible.
-
X-roller supports on the left and right sides. All nodes at the global minimum \(x\)-coordinate (left boundary) and maximum \(x\)-coordinate (right boundary) are assigned x-roller conditions (\(u = 0\), \(v\) free). This allows vertical settlement along the side boundaries while preventing lateral movement, reflecting the assumption that the slope extends indefinitely in both directions beyond the model domain. Corner nodes where the side boundaries meet the base retain their fixed condition — fixed supports take precedence over rollers.
-
Force boundary conditions from distributed loads. If distributed loads are defined in the input template, the boundary element edges along each load line are identified and assigned consistent equivalent nodal forces, \(f_i = \int N_i\, p\, d\Gamma\) integrated edge-by-edge with Gauss quadrature (for a uniform pressure on a quadratic edge this is the 1/6–2/3–1/6 corner–midside–corner split). Simple tributary-length lumping is not used: on quadratic edges it misallocates corner and midside forces, leaving a chain of self-equilibrated nodal couples of order \(pL/6\) along the boundary that appears as spurious near-surface stress oscillation — strong enough to falsely yield the skin elements when the applied pressure is large compared to the soil strength (e.g., reservoir loading). If a force node coincides with a roller or fixed boundary, both the displacement constraint and the applied force are preserved.
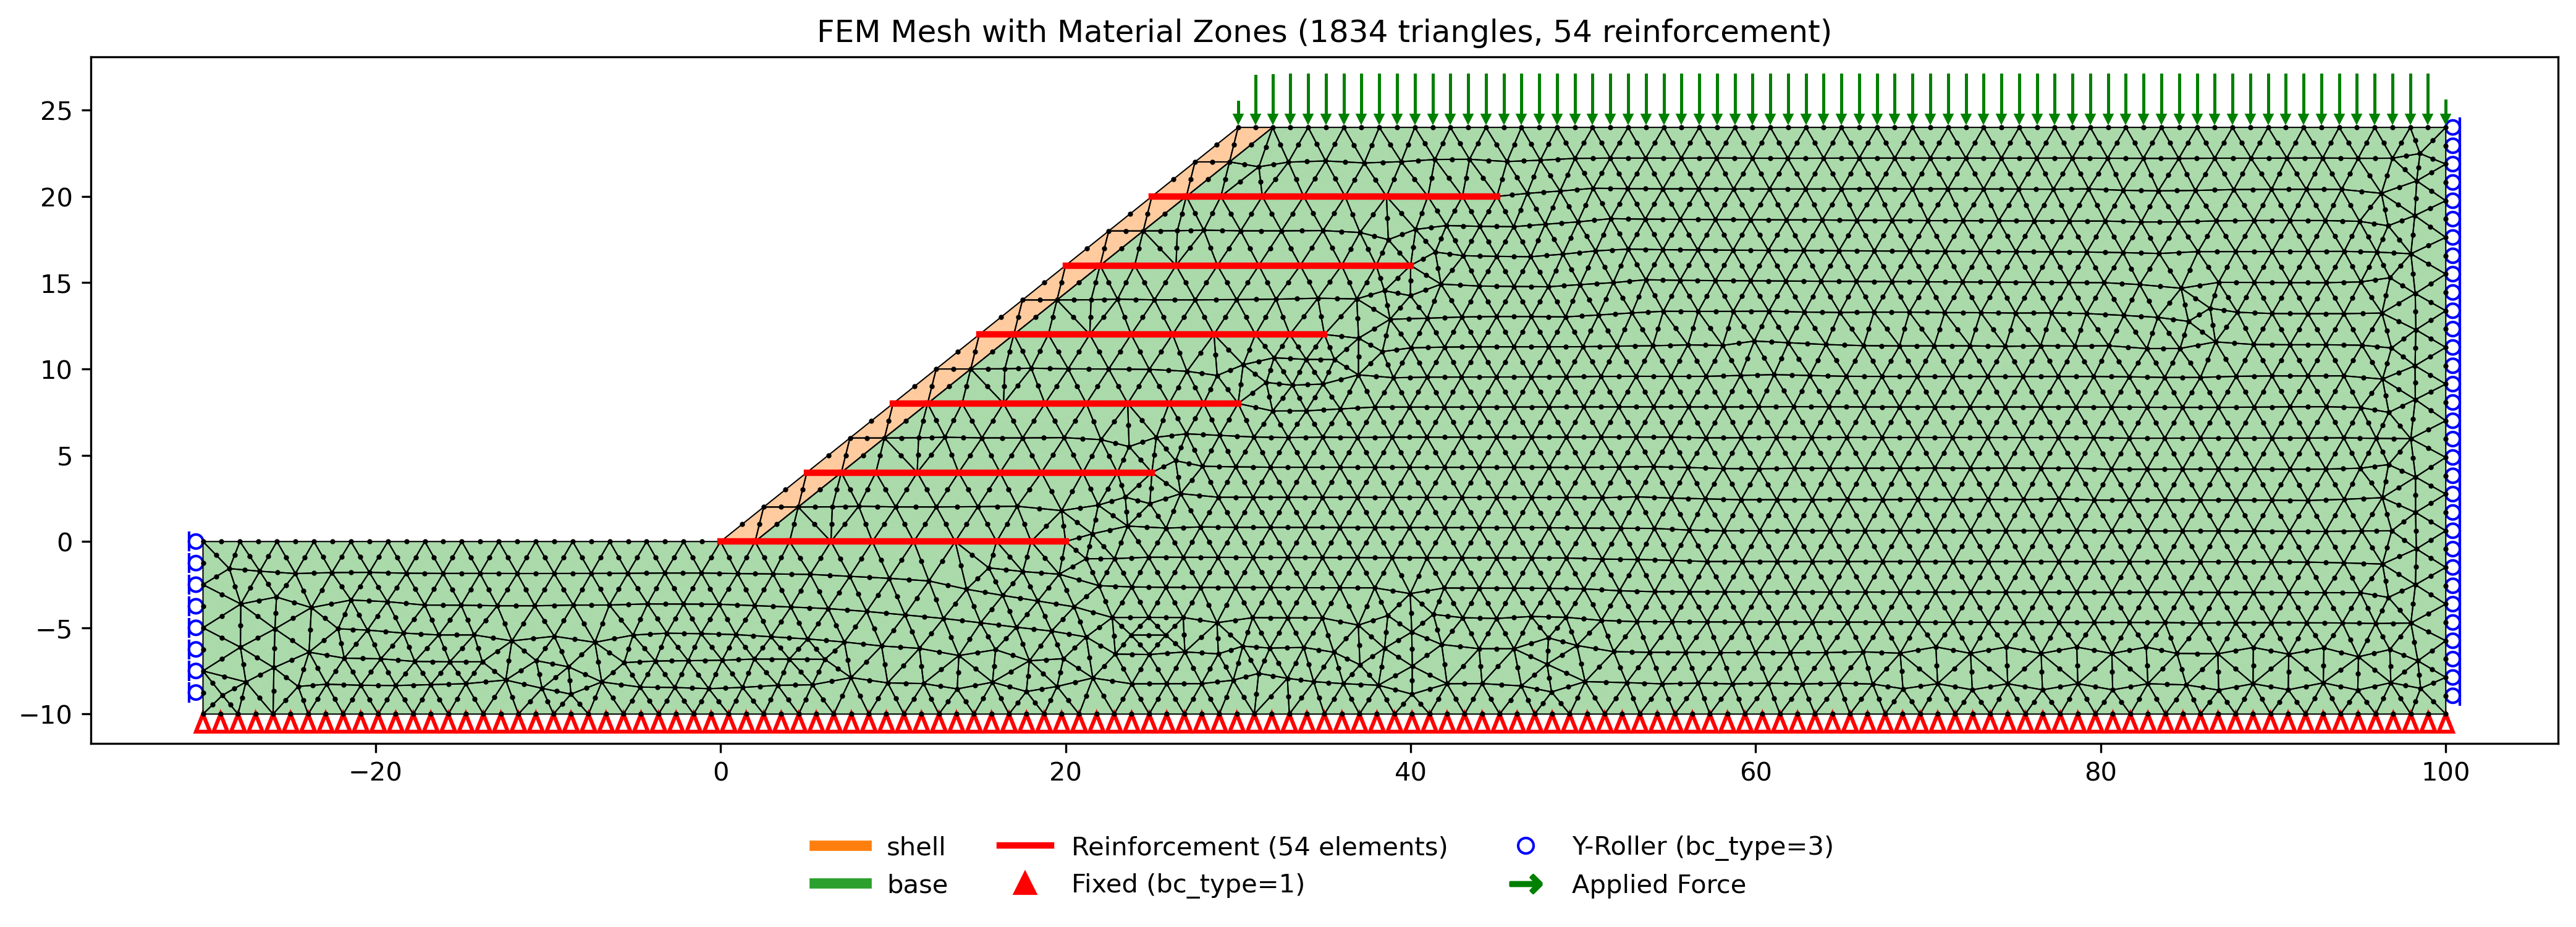
The figure below shows the resulting boundary conditions for the reinforced slope example from the FEM Samples page (Problem 1). Fixed supports (triangles) line the base of the mesh. X-roller supports (circles) line the left and right vertical boundaries, allowing vertical movement but preventing horizontal displacement. The ground surface and slope face are free. Force boundary conditions from a 240 psf surcharge are shown as arrows along the slope crest. Reinforcement elements are shown as red lines within the slope body.
Elastic-Plastic Behavior: Viscoplastic Algorithm
The finite element formulation described above assumes purely elastic behavior governed by the elastic constitutive matrix \([D_e]\). However, when soil elements reach the failure envelope defined by the Mohr-Coulomb criterion, plastic deformation occurs. XSLOPE handles this using the viscoplastic algorithm described by Griffiths & Lane (1999) and Smith & Griffiths (2004), which provides a robust and elegant approach to elastic-perfectly plastic finite element analysis.
Overview of the Viscoplastic Approach
Unlike traditional elastic-plastic methods that modify the stiffness matrix when elements yield, the viscoplastic algorithm keeps the elastic stiffness matrix \([K]\) constant throughout the analysis. Plastic behavior is instead handled through accumulated viscoplastic strains that generate body load corrections added to the right-hand side of the equilibrium equations. This has two major advantages:
- The stiffness matrix is assembled and factorized only once, then reused for all iterations via back-substitution
- The algorithm is unconditionally stable for appropriate choice of the time step parameter
Viscoplastic Iteration Process
For a given set of strength parameters (c, φ) and applied loads, the solution proceeds as follows:
1. Setup (performed once):
- Assemble global elastic stiffness matrix \([K]\) using \([D_e]\) for all elements
- Build gravity load vector \(\{F\}_{gravity}\)
- Pre-factorize \([K]\) using sparse LU decomposition (reused for all iterations)
- Initialize viscoplastic strains \(\{\varepsilon^{vp}\} = 0\) at all Gauss points
2. Initial Elastic Solution:
- Solve \([K]\{U\} = \{F\}_{gravity}\) using the pre-factored matrix
3. Viscoplastic Iteration Loop:
Each iteration builds a corrected load vector and solves the full system:
a. Start with gravity loads: \(\{F\} = \{F\}_{gravity}\)
b. At each Gauss point in every element (4-component plane strain, following Smith & Griffiths' nst=4 formulation — \(\sigma_z\) is carried explicitly so the algorithm can relax it through plastic \(\varepsilon_z\)):
- Compute total in-plane strains from current displacements: \(\{\varepsilon\} = [B]\{u_e\}\)
- Compute elastic strains: \(\{\varepsilon^{el}\} = \{\varepsilon\} - \{\varepsilon^{vp}\}\), with elastic \(\varepsilon_z^{el} = -\varepsilon_z^{vp}\) (total \(\varepsilon_z = 0\))
- Compute the 4-component stress \(\{\sigma\} = [D_e^{4}]\{\varepsilon^{el}\}\), \(\{\sigma\} = [\sigma_x, \sigma_y, \tau_{xy}, \sigma_z]\)
- Form effective stresses (\(\sigma' = \sigma - u\) on the three normals) and the stress invariants: mean stress \(\sigma_m\), deviatoric stress \(\bar{\sigma} = \sqrt{3 J_2}\), and Lode angle \(\theta\)
- Evaluate the Mohr-Coulomb yield function in invariant form (Smith & Griffiths' MOCOUF): \(f = \sigma_m\sin\phi + \bar{\sigma}\left(\dfrac{\cos\theta}{\sqrt{3}} - \dfrac{\sin\theta\sin\phi}{3}\right) - c\cos\phi\)
- If \(f > 0\) (yielding): compute the viscoplastic strain increment \(\Delta\varepsilon^{vp} = f \cdot \dfrac{\partial Q}{\partial \sigma} \cdot \Delta t\) where \(\partial Q/\partial \sigma\) is the plastic-potential gradient (MOCOUQ form, \(\psi = 0\)) with Smith & Griffiths' corner treatment: within ~0.7° of the Lode-angle corners (\(|\sin\theta| > 0.49\)) the \(\theta\)-dependence is frozen at the corner value, keeping the flow direction finite where \(\tan 3\theta\) blows up
- Accumulate: \(\{\varepsilon^{vp}\} \mathrel{+}= \Delta\varepsilon^{vp}\)
c. Add body load corrections from viscoplastic strains:
\(\{F\} \mathrel{+}= \sum_{elements} \int [B]^T [D_e] \{\varepsilon^{vp}\} \, dA\)
d. Solve \([K]\{U_{new}\} = \{F\}\) using the pre-factored matrix
e. Check convergence (see below)
f. If not converged, repeat from step (a) with updated displacements
Pore Pressure at Gauss Points:
The pore pressure \(u\) is evaluated at each Gauss point using the pore pressure option specified for each material in the input template. Three options are available:
- None (\(u = 0\)): No pore pressure. The yield check uses total stress.
- Piezometric line (
"piezo"): The physical coordinates of the Gauss point are computed via the shape functions (\(x_{gp} = \sum N_i x_i\), \(y_{gp} = \sum N_i y_i\)), and the pore pressure is calculated as \(u = \gamma_w (z_{piezo} - y_{gp})\) where \(z_{piezo}\) is the elevation of the piezometric surface at the Gauss point's horizontal position. Negative values (above the piezometric surface) are clamped to zero.- Seepage solution (
"seep"): Pore pressures from a prior seepage analysis (stored as nodal values) are interpolated to each Gauss point using the element shape functions: \(u_{gp} = \sum N_i \cdot u_i\). Negative values are clamped to zero, since the FEM stress analysis uses effective stress and suction (negative pore pressure) is conservatively ignored.The pore pressures enter the analysis through the effective-stress formulation (
pp_formulation="effective", the default): the equilibrium statement for total stress, \(\int B^T (\sigma' - u\, m)\, dV = F_{ext}\) with \(m = [1, 1, 0, 1]^T\), moves the pore-pressure term to the load vector, \(\int B^T \sigma'\, dV = F_{ext} + \int B^T m\, u\, dV\), so the stresses computed from the displacement solution are effective stresses directly and the yield check uses them as-is. Physically, the added load term converts the body force in submerged soil to its buoyant weight (plus seepage forces wherever \(u\) is not hydrostatic), so all three effective stress components below a flooded boundary come out compressive (\(\sigma'_v = \gamma' z\), \(\sigma'_h = K_0 \sigma'_v\)) and level flooded ground sits elastically at rest. The alternative legacy recipe (pp_formulation="total"), in which the total-stress elastic problem is solved and \(u\) is subtracted at each Gauss point before the yield check, leaves a spurious effective-tension zone of magnitude \(\frac{1-2\nu}{1-\nu}u\) at submerged boundaries — the lateral elastic response to a water load is only \(\frac{\nu}{1-\nu}\) of it, while the pore pressure subtracts all of it — which yields and creeps at any strength-reduction factor.
Key Parameters:
- Time step \(\Delta t\): A numerical parameter (not physical time) that controls stability. Following Smith & Griffiths (their Program 6.1 form): \(\Delta t = \dfrac{4(1+\nu)}{3E}\). The Mohr-Coulomb stability bound \(\Delta t = \dfrac{4(1+\nu)(1-2\nu)}{E(1-2\nu+\sin^2\phi)}\) is ~2.6× larger and was found to drive a sustained limit cycle at Gauss points in mild effective tension beneath reservoir loading (the per-iteration redistribution overshoots and never settles); the smaller value is in the stable regime. Note that the per-iteration displacement increment scales with \(\Delta t\), so the convergence tolerance and failure criterion are calibrated jointly with it.
- Flow rule \(\dfrac{\partial Q}{\partial \sigma}\): non-associated flow with dilation angle \(\psi = 0\) (no plastic volume change), evaluated from the full invariant form with Lode-angle corner treatment as described above. The gradient implementation is verified against finite differences of \(Q\) to machine precision.
- Maximum iterations: 3000 (true equilibria near the critical factor settle slowly; Griffiths & Lane used a ceiling near 1000, but hundreds to a few thousand iterations may be needed just below failure)
- Tension cutoff (optional, default off;
tension_cutoffparameter): a second viscoplastic yield surface, a Rankine cutoff \(F_t = \sigma_1' - T\) that caps the major (most-tensile) principal effective stress at \(T\), applied by the same damped viscoplastic mechanism as the Mohr-Coulomb surface above (the two are combined by Koiter's rule at a corner where both are active). The globaltension_cutoffflag is the \(T = 0\) case (no principal tension permitted anywhere); a per-material cap is set through the mat sheet's t_cut column (blank = no cutoff; see Worksheet: mat in the Input Template) and is auto-wired intosolve_fem()/solve_ssrm()the same wayelastic_materialsis. The \(\psi = 0\) Mohr-Coulomb flow is purely deviatoric and cannot on its own return a stress state near or beyond the Mohr-Coulomb apex; this surface handles it. With the effective-stress pore-pressure formulation such states rarely arise below failure — the cutoff matters most for genuine tension zones (e.g., steep crests at low confinement) or fills with a low or zero apex. Griffiths & Lane (1999) include no tension treatment.
Key Points:
- Constant stiffness: \([K]\) never changes — all nonlinearity enters through the body load corrections
- Mixed response: The slope contains both elastic Gauss points (\(f < 0\)) and yielding Gauss points (\(f > 0\)) simultaneously
- Load redistribution: As Gauss points yield and accumulate viscoplastic strains, stress redistributes to surrounding regions through the body load correction mechanism
- Elastic strains matter: The yield check uses stress from elastic strains \(\{\varepsilon\} - \{\varepsilon^{vp}\}\), not total strains — this correctly accounts for stress relief from already-accumulated viscoplastic deformation
Convergence Criterion
The viscoplastic iteration loop requires a convergence criterion to determine when the stress redistribution has reached equilibrium. A displacement-change test alone is not sufficient: a slope past its critical strength-reduction factor can creep slowly enough that the per-iteration displacement change drops below any tolerance while the slope is in fact failing — a "converged" flag from such a test is a snapshot of ongoing creep, not equilibrium. XSLOPE therefore requires two conditions simultaneously:
- Displacement settled — Smith & Griffiths' CHECON test, the maximum-norm relative change in the displacement vector between iterations:
\(\dfrac{\max_i |U_i^{(k+1)} - U_i^{(k)}|}{\max_i |U_i^{(k+1)}|} < \text{tol}\)
- Force equilibrium — the criterion of Dawson, Roth & Drescher (1999): every node's out-of-balance force, normalized by the gravitational body force acting on that node, must fall below a tolerance:
\(\displaystyle\max_i \dfrac{|\,\mathbf{r}_i\,|}{|\,\mathbf{f}^{\,grav}_i\,|} < \text{force\_tol}\)
Because this is an initial-stress viscoplastic scheme, each solve enforces \(\int B^T D(Bu - \varepsilon^{vp})\,dV = F_{ext}\) exactly using the previous iteration's plastic strains. The state is therefore always in equilibrium with the stresses it was built from, and what is still out of balance is the amount by which the viscoplastic body load is still changing — the increment of \(\{loads\} - \{loads\}_{base}\) between iterations. When plastic flow genuinely ceases that increment decays to zero and the stress field is both admissible and in equilibrium. When the slope is failing, flow never ceases: the increment plateaus at a non-zero value and feeds displacement indefinitely.
The locality of this test is what makes it trustworthy. The increment is non-zero only at nodes adjacent to Gauss points that are still flowing, so material added to the mesh that merely sits there in equilibrium — a deeper foundation, a longer runout — contributes exactly zero and cannot shift the maximum. A global norm ratio, \(\|\mathbf{r}\| / \|\mathbf{F}_{grav}\|\), measures the failure mechanism against the weight of the entire mesh and offers no such protection: padding the domain changes the yardstick without changing the slope.
The denominator is a lumped tributary weight, \(\sum_e \gamma_e A_e / n_e\) over the elements touching the node — not the consistent nodal gravity load. For a 6-node triangle the consistent load at a corner node is exactly zero (the corner shape function integrates to zero over the element, so the whole element weight goes to the midsides), and quad8 corners carry a small negative load. Normalizing by those would divide the residual by nothing at roughly a quarter of the nodes in any tri6 mesh. The lumped weight is what "the body force acting on that node" actually means, and it is strictly positive everywhere.
The state is in equilibrium when the maximum falls below force_tol; a failing state plateaus above it. The size of the gap between the two regimes is problem-dependent and is not guaranteed to be large. On a Hoek–Brown slope it spans several orders of magnitude; on the flagship Griffiths & Lane benchmark the marginal failing plateau sits about two orders above the default tolerance; but on a Mohr-Coulomb slope with a non-associated flow rule it can close entirely, for the reason below.
Three dependencies are worth knowing, because the tolerance is absolute:
- The yield-surface limit cycle (why
oob_windowexists). A one-iteration increment does not decay on a settled slope. Gauss points resting exactly on the yield surface flip their flow direction on alternate iterations, producing a clean period-2 oscillation in the viscoplastic body load — measured \(\cos(\Delta L_n, \Delta L_{n-1}) = -1.0000\) with \(|\Delta L|\) pinned at a constant, on a model whose displacements were frozen to four decimals and whose accumulated body load was frozen to seven significant figures. Its amplitude is proportional to \(\Delta t\), so damping the timestep shrinks it but never removes it: no iteration budget and nodt_scalecan clear it, and a stable slope is reported as failing forever. This is what made the predicate non-monotone in \(F\) and the bisection ill-posed. Averaging the increment overoob_windowiterations (default 10) cancels the mode exactly while leaving genuine plastic drift (\(\cos = +1\)) untouched, and restores monotonicity. The verdict is insensitive to the width — 10, 50 and 200 agree on the same \(F\) at the same iteration — so this rejects a specific numerical mode rather than tuning a threshold. Note this is not the tension apex: enablingtension_cutoffdoes not remove the floor (measured: no change at all on RS2-40, and still ~45× above tolerance on RS2-4).- Iteration count. The test demands actual force equilibrium rather than a decayed rate, and displacements settle long before the per-node maximum does (a benchmark whose \(\max|u|\) is frozen by iteration ~5,000 may only reach
force_tolat ~11,000). Budget roughly 3× the iterations the older rate-based criterion needed; a ceiling set too low silently truncates a converging solve and reports it as failure, biasing FS low.- Element size. The ratio scales roughly as \(1/h\) — the numerator is an internal-force residual (\(\sim\sigma h\)) while the denominator is a body force (\(\sim\gamma h^2\)). A coarser mesh therefore narrows the margin.
- Timestep scale. The residual is the increment of the viscoplastic body load, which is proportional to \(\Delta t\). Shrinking
dt_scaleshrinks the residual without making the slope any more stable, so a failing state can be driven under an absoluteforce_toland reported as converged. Leavedt_scaleat 1.0 unless you have a specific reason not to, and never lower it to force a reluctant model to "converge".
Implementation in XSLOPE:
- Default tolerances: \(\text{tol} = 10^{-3}\) (displacement); \(\texttt{force\_tol} = 10^{-3}\) (force equilibrium, Dawson's published value)
- Maximum iterations: 3000 (true equilibria near the critical factor settle slowly — 1500–4000 iterations is normal just below failure, consistent with Griffiths & Lane's reported 792 iterations just below their Example 1 failure point). A genuinely stable trial that exhausts the ceiling is called failed, which biases the factor of safety low — the conservative direction.
- Displacement limit: viscoplastic displacement >
max_disp_factor× mesh height ⇒ failed. Disabled on the default criterion, and deliberately so: its yardstick is the height of the mesh, not of the slope, so it loosens as a model is given a deeper foundation. The force-equilibrium test has no such dependence and supersedes it.
Submerged boundaries. Problems with reservoir loading on a submerged boundary (water pressure applied as a boundary load plus pore pressures in the soil) converge like any other problem under the effective-stress pore-pressure formulation combined with consistent boundary-load integration: the submerged soil carries its buoyant weight, the flooded surface skin is in compression, and trials below the critical strength-reduction factor reach true equilibrium (the G&L Example 6 dam at \(F = 1\) settles in a handful of iterations). A useful sanity check for any submerged model is to run a single solve at \(F = 1\) and confirm it converges quickly with an essentially elastic strain field — flooded ground at working strength must sit quietly; if it does not, suspect the inputs (loads inconsistent with boundary pore pressures) rather than tightening solver knobs. Two numerical requirements matter for this problem class: quadratic triangles (tri6) are preferred over quad8 (the 2×2 reduced-integration quad has a zero-energy hourglass mode that persistent near-surface forcing can excite), and the boundary tractions must be integrated consistently over the element edges (XSLOPE does this automatically; see Boundary Conditions above).
Surficial (Skin) Failures and the Minimum-Slip-Depth Filter
On a purely frictional face (\(c = 0\)) the critical mechanism is a shallow slide running parallel to the slope, with \(FS = \tan\phi / \tan\beta\) — a result that is independent of depth, so the shallowest surface governs. The per-node force-equilibrium criterion detects this "skin" faithfully, and because it is the true global minimum the reported factor of safety can sit well below a deeper, more conventional mechanism — and below published values that report the deeper one. This is physically correct but often not the engineering question, and the steep, purely frictional faces of embankment dams are where it shows up most.
The optional min_slip_depth parameter — on both solve_fem/solve_ssrm and the LEM searches, off by default — excludes any failure shallower than the given depth below the ground surface, so the analysis reports the deeper mechanism instead. It is the finite-element analogue of the minimum-slip-depth filter that limit-equilibrium codes (e.g. Slide2) apply to the same effect. With the filter off, the reported factor of safety is the true global minimum, skin included.
Choosing min_slip_depth. As you increase the depth, the factor of safety follows a characteristic curve: it holds at the surficial-skin value while the cutoff is still inside the failing band, rises as the cutoff clears the band, then flattens onto a plateau — the deep-seated factor of safety. Because of that plateau, the choice is robust: any depth on the flat part returns the same FS.
So don't pick one value blind — sweep it and find the plateau. Run the analysis at a handful of depths (say 5, 10, 15, 20, 25 % of the slope height) and watch the FS:
- Still rising → the cutoff is inside the surficial band; go deeper.
- Flat → you are on the plateau; that value is the deep-seated FS. Report it.
- Practical starting point: ~10–20 % of the slope height (both dam benchmarks reach their plateau within that band).
Read the result as a diagnostic, too:
- A large gap between the filter-off value and the plateau means a surficial skin was governing the unfiltered result (dry Talbingo dam: the 1.68 downstream-face skin vs a ~1.8 deeper mechanism the filter recovers; the deeper value is mesh-sensitive and is not the dam's benchmark FS — the skin is, see RS2-4).
- A small gap means no significant skin — the deep mechanism already governs; leave the filter off.
- If the FS never flattens and keeps climbing toward a large fraction of the slope height, you have gone past the real mechanism and are excluding genuine failure — back off to where it plateaued. (Set the depth deeper than the mesh itself and the solver refuses outright rather than returning a false answer.)
Set the same min_slip_depth in the LEM search and the SSRM run so both report the same mechanism, keeping an LEM/SSRM comparison on like-for-like surfaces.
The solve_fem() Function
The viscoplastic algorithm described above is implemented in the solve_fem() function in the fem.py module. This function takes a FEM data dictionary (built by build_fem_data()) and an optional strength reduction factor \(F\), assembles and factors the elastic stiffness matrix once, then runs the viscoplastic iteration loop until convergence or the maximum iteration count is reached.
from xslope.fileio import load_slope_data
from xslope.mesh import build_mesh_from_polygons
from xslope.fem import build_fem_data, solve_fem

# Load slope data from input template
slope_data = load_slope_data("inputs/slope/input_template.xlsx")

# Build mesh (quad8 elements recommended — see Element Type Selection below)
mesh = build_mesh_from_polygons(polygons, target_size=4, element_type='quad8')

# Build FEM data dictionary
fem_data = build_fem_data(slope_data, mesh)

# Solve with unreduced strength (F=1.0)
solution = solve_fem(fem_data, F=1.0, debug_level=1)

if solution['converged']:
    print(f"Converged in {solution['iterations']} iterations")
    print(f"Max displacement: {solution['max_displacement']:.6f}")
else:
    print(f"Did not converge after {solution['iterations']} iterations")
The key parameters of solve_fem() are:
F(default 1.0): Strength reduction factor applied as \(c_r = c/F\) and \(\tan\phi_r = \tan\phi / F\). When called directly, \(F = 1.0\) gives the unreduced solution; values of \(F > 1.0\) can be used to test stability at specific reduction levels.max_iterations(default 3000): Maximum viscoplastic iterations before declaring non-convergence.tolerance(default \(10^{-3}\)): Convergence tolerance for the elastic-relative displacement criterion described above.max_disp_factor(default 0.1): If the maximum viscoplastic displacement exceeds this fraction of the mesh height, the solve is terminated early and declared non-converged. Set toNoneto disable this check.debug_level(default 0): Controls output verbosity — 0 for silent, 1 for a summary, 2 for per-iteration details.
The returned solution dictionary contains the convergence status, nodal displacements, element stresses and strains, viscoplastic shear strains, yield function values, and the unbalanced force ratio — all of which can be used for post-processing and visualization with plot_fem_results().
Shear Strength Reduction Method (SSRM)
The Shear Strength Reduction Method (SSRM) represents the most widely adopted approach for determining factors of safety in finite element slope stability analysis, providing a rigorous and theoretically sound alternative to traditional limit equilibrium methods (Matsui & San, 1992; Griffiths & Lane, 1999). This method elegantly bridges the gap between the limit equilibrium concept of factor of safety and the stress-strain framework of finite element analysis. The fundamental principle underlying SSRM is conceptually straightforward yet mathematically sophisticated. Rather than assuming a failure surface and checking equilibrium conditions, SSRM systematically reduces the soil's shear strength parameters until the finite element system can no longer maintain equilibrium under the applied loading conditions. The reduction factor required to bring the slope to the brink of failure represents the factor of safety, defined consistently with traditional limit equilibrium approaches.
Methodology
The SSRM procedure follows a systematic approach that progressively weakens the soil until failure occurs. The process begins by reducing both cohesion and friction angle by a trial factor \(F\) according to the relationships:
\(c_r = \dfrac{c}{F}\)
\(\tan \phi_r = \dfrac{\tan \phi}{F}\)
This reduction scheme ensures that both components of shear strength are diminished proportionally, maintaining the fundamental character of the Mohr-Coulomb failure criterion while systematically reducing the available resistance to shear failure. The choice to reduce the tangent of the friction angle rather than the friction angle itself ensures mathematical consistency and avoids complications that arise when the friction angle approaches zero.
With the reduced strength parameters, the finite element system is solved using the same equilibrium equations and constitutive relationships employed in conventional stress analysis. However, as the reduction factor increases, the soil's capacity to resist the applied gravitational and external loads diminishes, leading to progressively larger deformations and increasing numbers of elements reaching the yield condition.
The iterative nature of SSRM requires careful monitoring of the solution behavior to identify the onset of failure. Convergence characteristics provide the primary indicator of impending failure, as the finite element system transitions from stable equilibrium solutions to unstable behavior characterized by rapidly increasing displacements and failure to achieve force equilibrium.
The critical factor of safety is determined when the iterative solution process fails to converge within acceptable tolerances, indicating that the reduced strength parameters are insufficient to maintain equilibrium under the applied loading conditions. This point represents the transition from stable to unstable behavior and corresponds to the classical definition of factor of safety as the ratio of available strength to required strength for equilibrium.
SSRM Failure Criteria
Determining the critical factor of safety in the SSRM requires a criterion to distinguish stable from unstable configurations as the strength reduction factor \(F\) increases. XSLOPE implements three failure criteria, selectable via the failure_criterion parameter in solve_ssrm().
1. Non-Convergence ("non_convergence", default)
The classical Griffiths & Lane (1999) approach: bisection on whether the viscoplastic iteration converges. In XSLOPE "converges" means true equilibrium — both the CHECON displacement test and the force-equilibrium test are satisfied (see Convergence Criterion above) — so the bisection brackets the genuine boundary between states that reach static equilibrium and states that creep indefinitely.
The force-equilibrium half is Dawson, Roth & Drescher's, not Griffiths & Lane's: G&L's own criterion is the displacement test plus an iteration ceiling. In practice the displacement test alone almost never discriminates here — a slope creeping steadily past its critical factor produces a bounded per-iteration displacement change measured against a growing total, so the ratio decays and the test passes on states that are plainly failing. It is the force test that separates them.
Validated against: Griffiths & Lane Example 1 (FS ≈ 1.40 vs published 1.4), their Example 6 dam without free surface (≈ 2.4-2.5 vs published ~2.4), and the geogrid-reinforced slope (≈ 1.65 vs the limit-equilibrium Spencer value 1.59 on the same model).
2. Displacement Limit ("displacement_limit")
Bisection on whether the maximum viscoplastic displacement exceeds max_disp_factor (default 10%) of the mesh height within the iteration budget. A simple physical backstop; note that the verdict is coupled to the iteration budget for any state that creeps slowly rather than racing, so prefer the equilibrium-based default criterion.
3. Displacement Catastrophe ("displacement_increase")
Sweeps \(F\) values, locates the sharpest upturn of displacement versus \(F\) (the evidence Griffiths & Lane present as their Figs 2 and 18), and refines around it; related to the average-residual-displacement-increment criterion of Sun, Wang & Zhang (2021) — and like that criterion, it reads the displacement at a characteristic point rather than the global maximum. The characteristic point is selected automatically: after the coarse sweep, the node whose plastic displacement grew fastest between the lowest and highest \(F\) — a node on the developing failure mechanism — becomes the measurement point, and the sweep curve is re-read there before refinement. (A specific point can also be supplied via char_point=(x, y).)
The automatic selection makes the criterion robust against any localized background deformation that grows steadily at all \(F\) (such zones have a low growth ratio, while mechanism nodes grow explosively near failure), so the measurement lands on the mechanism. Ratios are only evaluated above a noise floor (\(10^{-4}\) × mesh height).
Choosing a Failure Criterion
| Problem class | Criterion | Why |
|---|---|---|
| All slope problems, including submerged boundaries / reservoir loading | non_convergence (default) |
Bisection on true equilibrium. The force test is per-node, so it cannot be diluted by inert padding; it is not independent of element size (roughly 1/h). With the effective-stress pore-pressure formulation and consistent boundary loads, submerged problems converge cleanly below the critical factor (validated: G&L Ex. 6 wet 1.91 vs Spencer 1.915 and published ~1.9; Johnson Reservoir 1.30 vs Spencer 1.26) |
| Evidence/reporting for any problem | displacement_increase |
Produces the displacement-vs-F curve (the failure evidence Griffiths & Lane present); read the upturn at the automatically selected characteristic point |
It is also important to recognize that FEM-SSRM and limit equilibrium are fundamentally different formulations, and some difference in computed factors of safety is expected; comparing both (as in the verification suite) is the strongest consistency check available.
The solve_ssrm() Function
The SSRM procedure is implemented in the solve_ssrm() function, which repeatedly calls solve_fem() at different strength reduction factors to bracket and refine the critical factor of safety.
from xslope.fem import solve_ssrm

# Find critical factor of safety using SSRM
result = solve_ssrm(
    fem_data,
    F_min=1.0,
    F_max=2.0,
    tolerance=0.05,
    debug_level=1,
)   # failure_criterion defaults to "non_convergence"

if result['converged']:
    print(f"Factor of Safety: {result['FS']:.2f}")
    print(f"SSRM iterations: {result['iterations_ssrm']}")
    print(f"Final interval: {result['final_interval']}")
else:
    print(f"SSRM failed: {result.get('error', 'Unknown error')}")
The key parameters of solve_ssrm() are:
F_min(default 1.0): Lower bound for the bisection search. The slope must be stable (converge) at this reduction factor. If it does not, the bracket auto-expands downward (seef_adjust), so a low guess is not required.F_max(default 2.0): Upper bound for the bisection search. The slope should be unstable (not converge) at this reduction factor. If it still converges, the bracket auto-expands upward, so a high guess is not required.f_adjust(default 0.25): Step by which the bracket is widened when the guess is off —F_minis lowered /F_maxis raised byf_adjustand re-checked until the bracket is valid. So a wrong[F_min, F_max]still finds the factor of safety instead of aborting; a good guess brackets on the first try and skips the expansion (and a tight, correct guess speeds the bisection up). Expansion is bounded byf_min_floor(default 0.1 —Fstays positive; failing even here means FS <f_min_floor),f_max_ceiling(default 10.0 — still converging here means FS exceeds it, or the slope deforms ductilely without a catastrophe), andmax_expand(default 20 steps each way).tolerance(default 0.01): Bisection stops when \(F_{right} - F_{left} <\) tolerance. The reported FS is the midpoint of the final bracket (± tolerance/2); the bracket is returned infinal_interval.grid(defaultNone): If set, the search bisects over a fixed global grid of stepgrid(candidate factors \(F = i \cdot \text{grid}\)) rather than halving the supplied bracket. Because the failure threshold sits between two fixed global grid points — a property of the slope and mesh, not of the bracket — every starting[F_min, F_max]converges to the same cell, so the reported FS is independent of the bracket (identical to every decimal, not just ± tolerance/2), at the same ~\(\log_2\) cost.gridbecomes the precision. Used by the reliability analysis for reproducible results; leaveNonefor a single solve.failure_criterion(default"non_convergence"): Selects the failure criterion —"non_convergence"or"displacement_increase"as described above (see Choosing a Failure Criterion).pp_formulation(default"effective"): How pore pressures enter the analysis —"effective"moves \(u\) into the load vector so the computed stresses are effective stresses directly (recommended);"total"is the legacy subtract-at-Gauss-point recipe (see Pore Pressure at Gauss Points).dt_scale(default 1.0): Multiplier on the viscoplastic pseudo-time step; values < 1 damp the iteration (rarely needed). Do not lower it to make a model converge. The force-equilibrium residual is the increment of the viscoplastic body load and is proportional to \(\Delta t\), so shrinkingdt_scaleshrinks the residual without making the slope any more stable — a failing state can be pushed under the absoluteforce_toland reported as converged, inflating the factor of safety.max_disp_factor(default 0.1): Displacement-limit backstop fraction passed to eachsolve_fem()trial.n_sweep(default 10): Number of coarse sweep points for the"displacement_increase"criterion.convergence_tol(default \(10^{-3}\)) andmax_iterations(default 3000): Passed through tosolve_fem()for each trial.capture_failure_state(defaultTrue): After the bracket resolves, take one extra solve just beyond the critical strength — with the displacement backstop and the early divergence-exit turned off and a generous iteration ceiling — so the unconverged viscoplastic field develops the at-failure mechanism (the rotational collapse: crest settlement, toe heave). This is the deformed state the classic finite-element slope-stability figures show, in contrast to the last converged trial, which is sub-critical and reads as diffuse settlement. The captured field is returned asfailure_solution. It is purely a post-processing extra: the factor of safety, the bracket, andlast_solutionare unaffected, so turning it off leaves results unchanged. Leave it on for the plotting path; the reliability and sensitivity analyses turn it off because they read only the factor of safety over many runs and never draw the field.capture_margin(default 0.15): The proportional strength margin above the critical factor of safety at which the failure state is captured — the solve runs at \(F = \text{FS} \times (1 + \text{capture\_margin})\), floored at the failed edge of the bracket. A margin is needed because the bisection resolves the failed edge to withintoleranceof critical, where the collapse develops too slowly to become visible in a finite number of iterations; a modest margin puts the solve into the fully-developed-mechanism regime. Lower it toward ~0.05 to stay nearer the critical strength, or raise it for a bolder slip band.
The returned result dictionary contains the critical factor of safety (FS), the last converged solve_fem() solution (last_solution), the final bisection interval, and the number of SSRM iterations. When capture_failure_state is on it also contains failure_solution, the at-failure (unconverged) field. Passing last_solution to plot_fem_results() shows the near-critical converged state; passing failure_solution (via the failure_solution argument, below) shows the developed collapse mechanism.
SSR Exclusion Zones
Some vendor SSR analyses constrain where the failure mechanism is allowed to develop by holding one or more material zones at full strength throughout the reduction — RS2 exposes this as a per-material Apply_SSR flag, presented in its interface as an "SSR Exclusion Area." XSLOPE reproduces the same mechanism through the optional ssr_exclude parameter on solve_ssrm().
ssr_exclude takes a list of material zone names. At every trial factor \(F\), every zone not named still has its \(c\) and \(\tan\phi\) divided by \(F\) as usual, but a named zone keeps its full, unreduced strength — it can never itself yield, so the developing shear band is forced up and out of it. This has two related uses: reproducing a vendor analysis that constrains where the mechanism may localize, so the two solutions can be compared surface-for-surface, and excluding a zone that the model includes for load transfer but that isn't meant to participate in the failure — a stiff foundation, a rock unit, or any layer the analysis calls non-participating.
from xslope.fem import solve_ssrm

result = solve_ssrm(
    fem_data,
    F_min=1.2,
    F_max=1.5,
    tolerance=0.02,
    ssr_exclude=["Foundation lower"],
)
Names must match a material's name field in the input exactly; an unknown name raises ValueError rather than silently reducing nothing. The default, None, reduces every zone — today's ordinary behavior, unchanged.
Because the excluded zone can never fail, the reported factor of safety is conditional on that constraint rather than a true global minimum — run the unconstrained case too (ssr_exclude=None) so the comparison is explicit. RS2-P4-VP67 works through exactly this pair on a USACE end-of-construction embankment: an unconstrained SSRM of 1.076 riding a deep foundation mechanism, against 1.303 with the foundation's lower zone excluded, landing on the same toe-circle family RS2 reports at 1.33 under its own SSR Exclusion Area.
In XSlope Studio, ssr_exclude is the SSR exclusions… button in the Run FEM dialog (SSRM only) — see Finite element (FEM).
A second reinforcement-side run option, bond_slip on solve_fem()/solve_ssrm(), replaces a reinforcement line's fixed pullout ramp with a stress-dependent Coulomb bond that caps the force gradient along the embedded length (\(dT/ds \le P(c_{bond} + \sigma_n \tan\phi_{bond})\)). It is off by default (fixed ramp, bit-identical). See Bond-Slip Load Transfer.
Fast kernel (optional)
The cost of an SSRM run is dominated by the per–Gauss-point constitutive update (Step 6 of the viscoplastic loop), evaluated for every Gauss point on every iteration of every strength-reduction trial. XSLOPE ships an optional compiled kernel that runs this update in C (via Cython) instead of NumPy, which shortens a typical Mohr-Coulomb SSRM solve by roughly a third to a half.
It is opt-in and off by default. The pure-NumPy path is the permanent reference implementation and the oracle: every locked factor of safety in the verification suite is defined by it, and the compiled kernel is required to reproduce it bit-for-bit (a CI cross-check fails on any factor-of-safety disagreement or displacement-field difference above \(10^{-8}\)). You never need the kernel to run XSLOPE, and turning it on never changes a result — only the wall-clock time.
Enabling it. Pass fast_kernel=True to solve_fem() or solve_ssrm(). If the compiled module has not been built, the solver prints a warning and transparently falls back to the NumPy path, so the flag is always safe to set.
Building it. The kernel is not compiled by pip install; build it locally with Cython installed:
pip install Cython
python setup_kernel.py build_ext --inplace
This compiles xslope/_fem_kernel next to its .pyx source. Only the .pyx is tracked in the repository; the generated C and shared-object files are build artifacts. Once built, fast_kernel=True picks it up automatically.
Coverage. The kernel handles the standard Mohr-Coulomb material path, including the Rankine tension cutoff and the matric-suction apparent-cohesion term. Curved-envelope materials (power-curve and Hoek-Brown), which re-linearize their envelope every iteration, and all 1D reinforcement/pile work stay on the NumPy path automatically — a model that mixes them simply accelerates its Mohr-Coulomb groups and leaves the rest unchanged.
When to use it, and when not to. Reach for fast_kernel=True in checked batch work — a corpus of figures or trials where every result is compared against something, not taken on faith. The verification suite runs this way itself, as a fast-first tier with automatic reference fallback. Do not use it to define or re-record a locked factor of safety: the plain NumPy path alone defines every published and locked value in XSLOPE, permanently. It is also not available from XSlope Studio, by design — an interactive run has no checking step behind it, and on a mechanism sitting near a bifurcation the compiled kernel's floating-point re-association can shift which side of a bisection step a trial lands on, changing the reported factor of safety (see RS2-62, Analysis III's thin soft band, for a worked case).
Element Type Selection and Volumetric Locking
The Problem: Volumetric Locking in Low-Order Elements
A critical consideration in finite element slope stability analysis is the choice of element type. Low-order elements — specifically 3-node linear triangles (tri3) and 4-node bilinear quadrilaterals (quad4) — suffer from a well-known numerical pathology called volumetric locking that causes them to significantly overestimate the factor of safety.
Volumetric locking occurs because plastic deformation under the Mohr-Coulomb criterion (particularly with a non-associated flow rule where the dilation angle \(\psi = 0\)) produces nearly incompressible plastic strains — the material deforms in shear without changing volume. Low-order elements have too few degrees of freedom to simultaneously satisfy this incompressibility constraint and represent the displacement field accurately. The result is an artificially stiff response: the elements resist plastic deformation more than they should, requiring a larger strength reduction factor before failure occurs. This manifests as an unconservative (too high) factor of safety.
The severity of locking depends on the element formulation:
-
Constant-strain triangles (tri3) have a single integration point and only 6 displacement DOFs per element. The constant strain field cannot represent the complex shear deformation patterns that develop in plastic zones. This is the most severely affected element type.
-
Bilinear quadrilaterals (quad4) with full 2×2 integration have 8 displacement DOFs but still exhibit significant locking because the bilinear interpolation cannot adequately represent incompressible deformation modes.
-
Reduced integration (using fewer Gauss points than required for exact integration) can alleviate locking in quadrilateral elements. The 8-node quadrilateral (quad8) with 2×2 reduced integration is a particularly effective combination that avoids locking while maintaining accuracy.
Recommended Elements: Quadratic Formulations
Quadratic elements — 6-node triangles (tri6), 8-node quadrilaterals (quad8), and 9-node quadrilaterals (quad9) — provide sufficient degrees of freedom to represent incompressible plastic deformation without artificial stiffness. These element types should always be used for slope stability analysis with the SSRM.
The following table shows SSRM results for the Griffiths & Lane (1999) Example 1 benchmark problem (homogeneous slope with \(c/\gamma H = 0.05\), \(\phi = 20°\), slope angle 26.57°) using each element type with a target mesh size of 5. The expected factor of safety is approximately 1.40 (Griffiths & Lane report FS = 1.4 by FEM, Spencer's method gives FS = 1.376).
| Element Type | Nodes per Element | SSRM Factor of Safety | Error vs. Reference | Recommendation |
|---|---|---|---|---|
| tri3 | 3 | 1.70 | +21% | Not recommended — severe locking |
| quad4 | 4 | 1.56 | +11% | Not recommended — significant locking |
| tri6 | 6 | 1.41 | < 1% | Recommended |
| quad8 | 8 | 1.41 | < 1% | Recommended (default) |
| quad9 | 9 | 1.41 | < 1% | Recommended |
The three quadratic element types all converge to the same factor of safety (FS = 1.41), consistent with the published reference solution. The low-order elements overestimate FS by 11–21%, which would be unconservative and potentially dangerous in practice.
Practical Guidance
For slope stability analysis in XSLOPE:
-
Always use quadratic elements (tri6, quad8, or quad9) for SSRM analysis. The default element type in XSLOPE is quad8, which provides the best balance of accuracy and efficiency through reduced integration.
-
Do not use tri3 or quad4 for computing factors of safety. While these elements may be adequate for purely elastic problems or for qualitative assessment of stress distributions, they produce unconservative factors of safety in elastic-plastic slope stability analysis.
-
quad8 with reduced integration is the preferred choice following Griffiths & Lane (1999). The 2×2 Gauss integration (instead of the full 3×3 required for exact integration of the quadratic shape functions) effectively eliminates volumetric locking while providing accurate stress and strain fields.
-
tri6 elements are useful when the mesh must conform to complex geometries where quadrilateral elements would become highly distorted. The 3-point triangle integration rule provides sufficient accuracy for the quadratic interpolation.
-
quad9 elements with full 3×3 integration also produce correct results and may be preferred for problems requiring higher stress accuracy, though at a computational cost proportional to the additional Gauss points and the extra center node per element.
Seismic Forces
For both limit equilibrium and finite element slope stability analysis in XSLOPE, seismic loading is simulated using the pseudo-static method, which is a widely accepted approach for incorporating seismic effects into slope stability assessments. This method simplifies the complex dynamic response of soil during earthquakes by representing seismic loading as equivalent static forces applied to the slope mass. The pseudo-static approach assumes that the earthquake ground acceleration can be represented by a constant horizontal acceleration applied throughout the slope mass. This acceleration generates inertial forces that act on every element of soil, creating additional driving forces that tend to destabilize the slope.
In the finite element formulation, seismic loading is incorporated by modifying the body force vector to include both gravitational and seismic components:
\(\{b\}_{total} = \{b\}_{gravity} + \{b\}_{seismic}\)
For a horizontal seismic coefficient \(k\), representing the ratio of horizontal acceleration to gravitational acceleration, the seismic body forces are:
\(b_{x,seismic} = k \gamma\)
\(b_{y,seismic} = 0\)
The direction of the horizontal seismic force is chosen to maximize the driving forces that promote slope failure. For typical left-facing slopes, this corresponds to a leftward (negative x-direction) seismic acceleration that increases the shear stresses along potential failure surfaces. For a right-facing slope, the force acts in the positive x-direction. For some problems, such as dams or levees, the slope geometry can include both right- and left-facing slopes. With the limit equilibrium method, XSLOPE determines if a slope is right- or left-facing based on the location and geometry of the failure surface. But with the finite element method, both sides of a dam or levee are analyzed at the same time. Therefore, the user should adjust the sign of the seismic coefficient (k) in the Excel input template to indicate the direction of the pseudostatic seismic force. For the left-facing slopes, k should be entered as a negative value indicating a force in the negative x direction, and for right-facing slopes, k should be entered as a positive value.
The equilibrium equations are modified to include seismic body forces as follows:
\(\dfrac{\partial \sigma_x}{\partial x} + \dfrac{\partial \tau_{xy}}{\partial y} + b_x + k\gamma = 0\)
\(\dfrac{\partial \tau_{xy}}{\partial x} + \dfrac{\partial \sigma_y}{\partial y} + b_y = 0\)
where \(k\gamma\) represents the additional horizontal body force due to seismic loading, with \(k\) being the seismic coefficient and \(\gamma\) the unit weight of the soil. Since \(b_x = 0\) and \(b_y = -\gamma\), the equations simplify to:
\(\dfrac{\partial \sigma_x}{\partial x} + \dfrac{\partial \tau_{xy}}{\partial y} + k\gamma = 0\)
\(\dfrac{\partial \tau_{xy}}{\partial x} + \dfrac{\partial \sigma_y}{\partial y} - \gamma = 0\)
The seismic body forces are incorporated into the global force vector through element-level integration:
\(\{F\}_{seismic} = \sum_{e=1}^{N_{elem}} \int_{A_e} [N]^T \{b\}_{seismic} \, dA\)
For linear triangular elements, this integration yields nodal forces that distribute the seismic loading according to the element shape functions. The seismic forces are added to the gravitational body forces and any external applied loads to form the complete loading vector.
Structural Elements
XSLOPE supports two types of one-dimensional structural elements embedded within the two-dimensional soil mesh: truss elements for flexible reinforcement and beam elements for piles and concrete piers. Both element types share nodes with the surrounding 2D soil elements and participate in the viscoplastic iteration loop through body-force corrections.
-
Soil Reinforcement: Flexible reinforcement (geotextiles, soil nails, ground anchors) modeled as tension-only truss elements with axial stiffness \(EA/L\). Includes failure modes (pullout, peak-residual, complete failure), wished-in-place analysis considerations, and typical material properties.
-
Piles and Concrete Piers: Rigid structural elements modeled as beam elements with both axial stiffness (\(EA/L\)) and lateral bending stiffness (\(12EI/L^3\)). Unlike reinforcement, piles carry both tension and compression. Rotational DOFs are eliminated through static condensation to maintain compatibility with the 2-DOF-per-node soil mesh.
In both cases, the structural element properties are not reduced during SSRM strength reduction — only soil \(c\) and \(\tan\varphi\) are reduced. The resulting factor of safety represents the margin of safety in the soil strength, given the structural elements as-designed.
Integration with XSLOPE Framework
The integration of finite element capabilities into the XSLOPE framework leverages the established infrastructure for limit equilibrium and seepage analysis while extending the analysis capabilities to include rigorous stress-strain based slope stability assessment.
Input Integration
The finite element implementation uses XSLOPE's Excel-based input system. The slope geometry definitions, material property specifications, and boundary condition inputs that currently support limit equilibrium analysis provide an excellent foundation for finite element modeling. Material property definitions can leverage the existing cohesion \(c\), friction angle \(\phi\), and unit weight \(\gamma\) specifications that are in the XSLOPE input system. Additional parameters required for finite element analysis, such as Young's modulus \(E\) and Poisson's ratio \(\nu\), are included in the material property table in the Material tab.
The existing seepage analysis infrastructure provides a particularly valuable foundation for coupled seepage-stability finite element analysis. The current mesh generation capabilities and pore pressure calculation tools can be directly utilized to provide the groundwater input conditions required for effective stress analysis in the finite element system.
In the reinforcement table, some of the properties for each reinforcement line such as the pullout length \(L_p\) and maximum tensile force \(T_{max}\) are used for both limit equilibrium and finite element analysis. The additional parameters required for finite element analysis, such as the modulus of elasticity \(E\) and cross-sectional area \(A\), are also included in the reinforcement table. This allows the same reinforcement definitions to be used seamlessly across both analysis methods.
Pore Pressure Options
Pore pressures reduce the effective stress in the soil, which in turn reduces the available shear strength. XSLOPE supports three pore pressure options for each material zone, specified via the u column in the material property table of the input template:
None (u = "none"): No pore pressure is applied. The yield function uses total stress. This is appropriate for dry slopes or total stress analyses with undrained shear strength parameters.
Piezometric Line (u = "piezo"): A piezometric surface is defined in the input template as a series of coordinate points. The pore pressure at any point below the piezometric surface is computed as:
\(u = \gamma_w (z_{piezo} - z)\)
where \(\gamma_w\) is the unit weight of water, \(z_{piezo}\) is the elevation of the piezometric surface directly above the point, and \(z\) is the elevation of the point. For points above the piezometric surface, \(u = 0\) for the effective-stress yield check (suction is not credited by default; set phi_b to add it as apparent cohesion — see Matric suction).
Seepage Solution (u = "seep"): Pore pressures are obtained from a prior finite element seepage analysis performed with the seep.py module. The seepage analysis solves the groundwater flow equation on a triangular mesh, producing pore pressure values at all nodes:
\(u = \gamma_w (h - z)\)
where \(h\) is the hydraulic head from the seepage solution and \(z\) is the elevation coordinate. These nodal pore pressures are stored in the slope data and transferred to the structural mesh during build_fem_data(). Negative pore pressures (suction above the phreatic surface) are clamped to zero for the effective-stress yield check; the raw signed field is retained so that the optional matric-suction strength can credit that suction as apparent cohesion when phi_b is set.
For both the piezometric and seepage options, pore pressures are precomputed at each Gauss point during build_fem_data() using the element shape functions to interpolate from nodal values (seep) or by computing the physical coordinates of each Gauss point and projecting onto the piezometric surface (piezo). These precomputed values are then used directly in the effective stress yield check during the viscoplastic iteration, avoiding repeated interpolation at each iteration step.
Visualization of Results
The plot_fem_results() function provides a flexible interface for visualizing FEM solutions. It accepts a plot_type parameter that specifies one or more plot types to display as vertically stacked subplots. The available plot types are:
| Plot Type | Description |
|---|---|
deformation |
Deformed mesh overlay on the original mesh. The deformed shape is drawn in black over a dashed light outline of the original (undeformed) extent. Viscoplastic displacements (total minus elastic) are used when available, so the plot shows the failure mechanism rather than gravity settlement. When a captured at-failure field is supplied (see failure_solution below) the panel draws the developed collapse mechanism and its title reads "…at Failure"; otherwise it draws the supplied solution. The displacement multiplier is auto-calculated by default so the maximum deformation is approximately deform_percent of the mesh height, measured on the field actually drawn. |
shear_strain |
Viscoplastic maximum shear strain contours. This is the most important plot for identifying the failure mechanism — high shear strain concentrations reveal the failure surface without any prior assumption about its shape or location. Falls back to total shear strain if viscoplastic data is not available. |
displace_vector |
Displacement vectors at corner nodes. Like the deformed mesh plot, viscoplastic displacements are used when available to show the failure mechanism. Vectors below a threshold fraction of the maximum displacement are hidden to reduce clutter. |
displace_mag |
Displacement magnitude contours using the viridis colormap. Shows total displacement magnitude at each node as filled contours. |
stress |
Von Mises stress contours with yielded elements highlighted. Useful for identifying stress concentrations and the extent of the plastic zone. |
strain |
Von Mises equivalent strain contours computed from total strains. |
yield |
Mohr-Coulomb yield function contours. Positive values indicate yielding/failure, negative values indicate an elastic state. |
The default combination is ['deformation', 'shear_strain', 'displace_vector'], which provides a comprehensive view of the failure mechanism. The following example shows the SSRM results for the non-circular failure surface problem from the FEM Samples page (Problem 3), which features a thin weak clay layer controlling the failure mechanism:
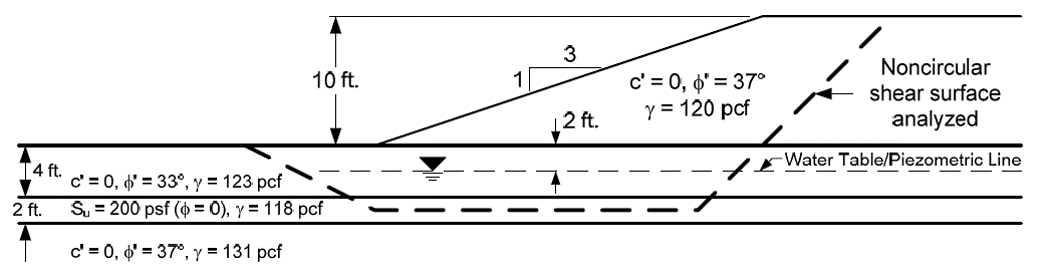
The top subplot shows the deformed mesh at the last converged solution, the middle subplot shows the shear strain concentration through the thin weak clay layer, and the bottom subplot shows the displacement vectors confirming lateral sliding along the clay layer:
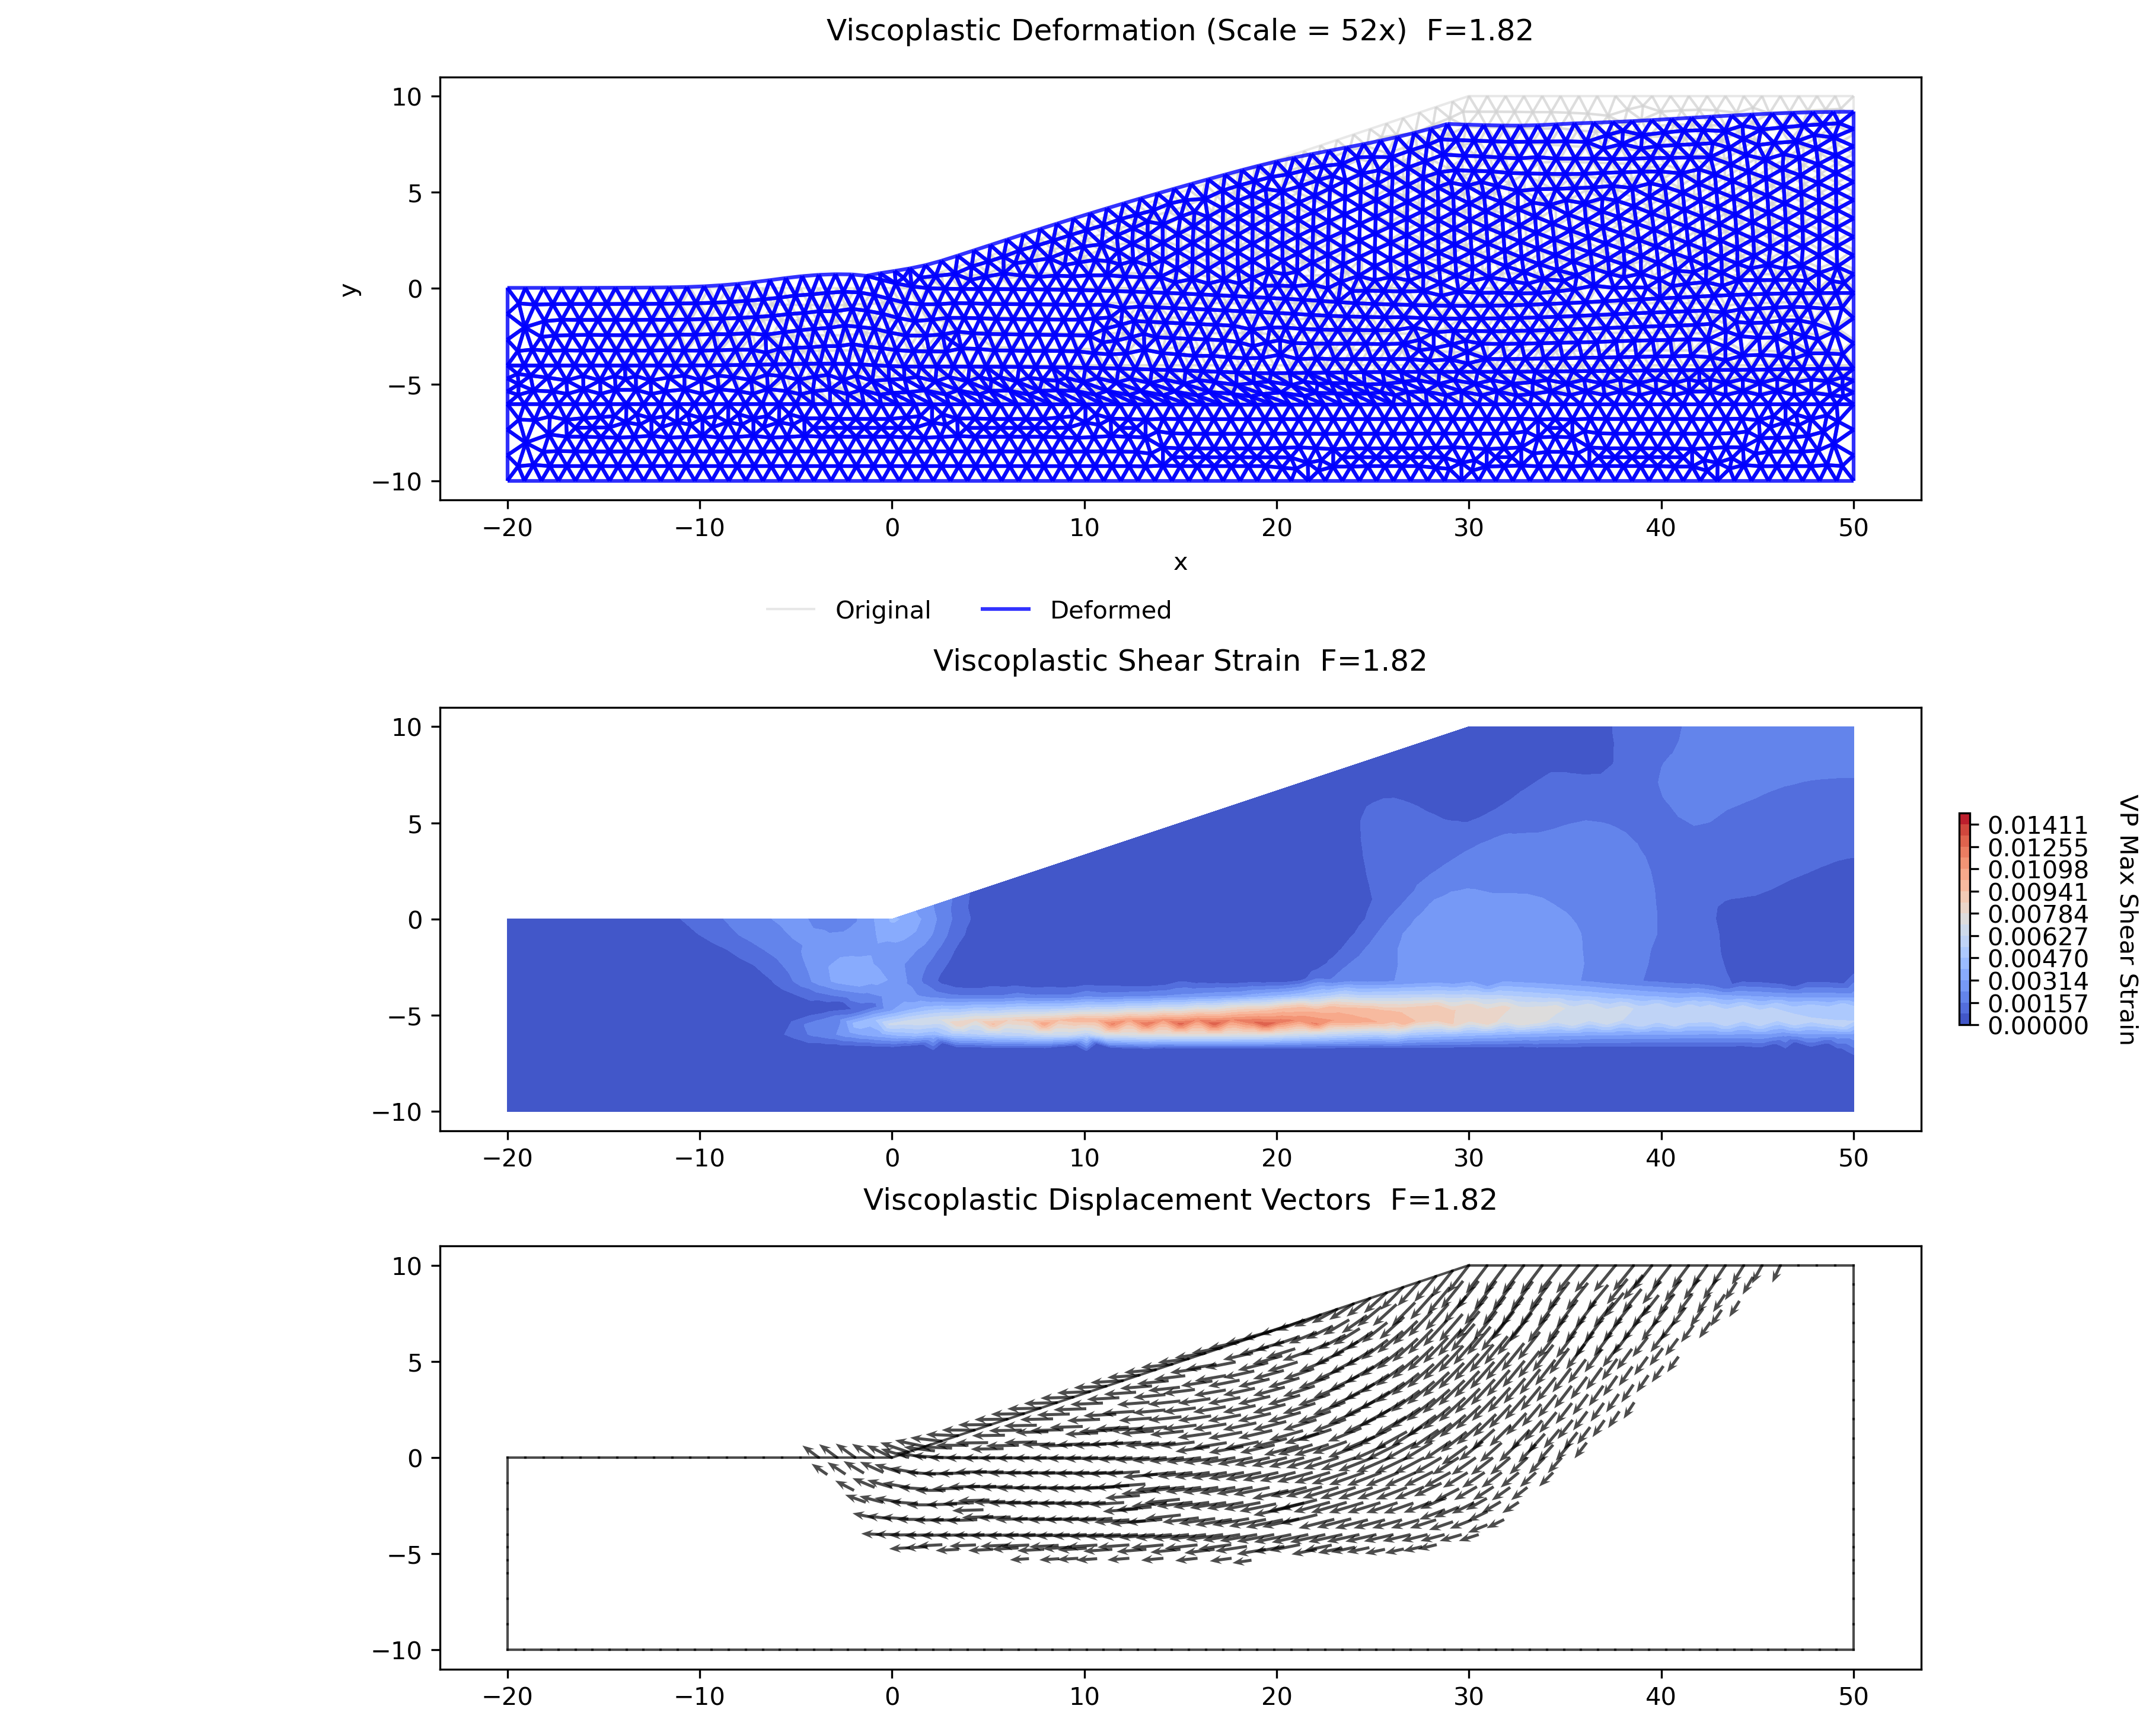
Additional options control the appearance of all plot types:
show_mesh— show or hide mesh lines on the contour and vector panels (default:True)show_reinforcement— show or hide reinforcement and pile elements (default:True)label_elements— show element ID labels at centroids (default:False)figsize— figure size as(width, height)in inches (default:(12, 8))save_png— save the figure to a PNG file (default:False)dpi— resolution for saved PNG (default:300)
The deformation and displacement-vector panels have these dedicated controls:
failure_solution— the at-failure field captured bysolve_ssrm()(result['failure_solution']). When supplied, the deformation and displacement-vector panels draw this developed collapse mechanism instead of the near-critical converged state, and the deformation title reads "…at Failure", leading with the factor of safety. Omit it (defaultNone) to draw the supplied solution.field_state— which field EVERY panel renders whenfailure_solutionis supplied:'failure'(default) draws the at-failure mechanism on the deformation, displacement-vector, and shear-strain/other contour panels alike, so a multi-panel figure never mixes states;'converged'draws the last-converged solution on all of them instead, with its own auto-scale exaggeration and dual-title convention. A no-op withoutfailure_solution.strain_stateis accepted as a backward-compatible alias.show_original— the original-mesh reference on the deformation panel:'outline'(default) a dashed light boundary outline at every mesh density,'mesh'the full light-gray grid (which collapses to the outline when the mesh is too dense to read as two overlaid grids), orFalsefor none.deformed_color— color of the deformed grid (default'k', black; use'blue'for the earlier style).deform_scale— an explicit displacement multiplier. Leave asNone(default) to auto-size fromdeform_percent, or pass a value to set the exaggeration factor directly.color_by_magnitude— color the displacement-vector arrows by |u| (default colormapvector_cmap='viridis') with a colorbar, instead of the default solid black used in the paper figures above.
A typical call for an SSRM analysis uses the default plot types and passes the captured at-failure field so the deformation and vector panels show the collapse mechanism:
plot_fem_results(fem_data, result['last_solution'],
                 plot_type=['deformation', 'shear_strain', 'displace_vector'],
                 fs=result['FS'],
                 failure_solution=result.get('failure_solution'),
                 save_png=True)
A single plot type can also be specified as a string rather than a list:
plot_fem_results(fem_data, solution, plot_type='shear_strain')
Exported Files
After a FEM analysis is run, XSLOPE can write the analysis outputs to files that share the input file stem. The mesh file is written when a new mesh is generated. The two CSV files are written with the following function call:
export_fem_solution(fem_data, solution, output_stem)
The two CSV files contain the primary nodal and element results used for post-processing. When an SSRM run has captured the at-failure mechanism, that snapshot is persisted alongside the converged solution as a second CSV pair plus a small metadata file, so a reloaded solution can re-render the deformation and displacement-vector panels from the failure mechanism rather than the converged field. Solutions saved before the snapshot existed simply lack these extra files and reload against the converged field as before.
When the model carries reinforcement and/or pile 1D elements, the per-element structural results are also written as their own engineer-readable CSVs. These double as results files for reading (a companion to the reinforcement and pile summary tables printed to the console) and let a reloaded solution re-render the reinforcement-force and pile-shear colorbars without re-solving. Each is written only when the corresponding element type is present, so a model without reinforcement or piles simply omits it.
| File | Description |
|---|---|
*_mesh.json |
Finite element mesh definition used by the analysis. This allows the generated mesh to be reused in later runs. |
*_fem_nodes.csv |
One row per node containing displacement results. |
*_fem_elements.csv |
One row per 2D element containing stress, strain, and yielding results. |
*_fem_reinf.csv |
One row per reinforcement 1D element: ids, endpoints, axial force, capacities, mobilization, and failure flags. Written only when the model has reinforcement. |
*_fem_piles.csv |
One row per pile beam element: ids, endpoints, axial/shear forces, end moments, structural capacities, and yield flags. Written only when the model has piles. |
*_fem_failure_nodes.csv |
At-failure nodal displacements (same columns as *_fem_nodes.csv), written only when the mechanism was captured. |
*_fem_failure_elements.csv |
At-failure element stresses, strains, and yielding (same columns as *_fem_elements.csv), written only when the mechanism was captured. |
*_fem_failure_reinf.csv |
At-failure reinforcement results (same columns as *_fem_reinf.csv), written when both reinforcement and a captured mechanism are present. |
*_fem_failure_piles.csv |
At-failure pile results (same columns as *_fem_piles.csv), written when both piles and a captured mechanism are present. |
*_fem_failure_meta.json |
Scalar metadata for the at-failure snapshot, including the trial strength-reduction factor. |
Mesh File Contents
*_mesh.json stores the mesh arrays needed to rebuild the model geometry and connectivity.
| Field | Description |
|---|---|
nodes |
Node coordinates. |
elements |
Element connectivity. |
element_types |
Number of active nodes in each element. |
element_materials |
Material id assigned to each 2D element. |
elements_1d |
1D reinforcement or pile element connectivity, when present. |
element_types_1d |
Number of active nodes in each 1D element, when present. |
element_materials_1d |
Reinforcement or pile line id for each 1D element, when present. |
Nodal Results Columns
*_fem_nodes.csv stores one row per node.
| Column | Description |
|---|---|
node_id |
1-based node number. |
x |
x-coordinate of the node. |
y |
y-coordinate of the node. |
u_x |
Total horizontal displacement. |
u_y |
Total vertical displacement. |
u_mag |
Magnitude of the total displacement vector. |
u_x_vp |
Viscoplastic horizontal displacement, computed as total minus elastic displacement. |
u_y_vp |
Viscoplastic vertical displacement, computed as total minus elastic displacement. |
u_mag_vp |
Magnitude of the viscoplastic displacement vector. |
Element Results Columns
*_fem_elements.csv stores one row per 2D element.
| Column | Description |
|---|---|
element_id |
1-based element number. |
material_id |
Material id assigned to the element. |
x_centroid |
x-coordinate of the element centroid. |
y_centroid |
y-coordinate of the element centroid. |
sigma_x |
Average element normal stress in the x direction. |
sigma_y |
Average element normal stress in the y direction. |
tau_xy |
Average element shear stress. |
sigma_vm |
Von Mises stress. |
eps_x |
Average element normal strain in the x direction. |
eps_y |
Average element normal strain in the y direction. |
gamma_xy |
Average engineering shear strain. |
max_shear_strain |
Maximum shear strain derived from the strain state. |
vp_shear_strain |
Viscoplastic maximum shear strain. |
plastic |
Boolean flag indicating whether the element yielded. |
yield_function |
Value of the Mohr-Coulomb yield function for the final stress state. |
Reinforcement Results Columns
*_fem_reinf.csv stores one row per reinforcement 1D element.
| Column | Description |
|---|---|
element_id |
Global 1D element index. |
line_id |
1-based reinforcement line id. |
x_start, y_start |
Coordinates of the element start node. |
x_end, y_end |
Coordinates of the element end node. |
axial_force |
Axial (tensile) force carried by the element. |
t_allow |
Allowable tensile capacity (reduced toward the ends by the pullout ramp). |
t_res |
Residual tensile capacity after softening (0 for brittle rupture). |
mobilization |
Ratio of axial force to allowable capacity. |
failed |
Boolean flag indicating the element reached its allowable capacity. |
softened |
Boolean flag indicating the element dropped to its residual capacity. |
Pile Results Columns
*_fem_piles.csv stores one row per pile beam element.
| Column | Description |
|---|---|
pile_index |
0-based pile element index (the order used by the pile-force arrays and colorbar). |
element_id |
Global 1D element index. |
line_id |
1-based pile line id. |
x_start, y_start |
Coordinates of the element start node. |
x_end, y_end |
Coordinates of the element end node. |
axial_force |
Axial force in the pile element. |
shear_force |
Lateral (shear) force in the pile element. |
moment_1, moment_2 |
Bending moments at the element's two nodes. |
v_cap |
Structural shear capacity per unit width (inf when uncapped). |
m_cap |
Structural moment capacity per unit width (inf when uncapped). |
yielded_shear |
Boolean flag indicating the element reached its shear capacity. |
yielded_moment |
Boolean flag indicating the element reached its moment capacity. |
yielded |
Boolean flag indicating the element yielded in shear or moment. |
References
Dawson, E.M., Roth, W.H., & Drescher, A. (1999). Slope stability analysis by strength reduction. Géotechnique, 49(6), 835-840.
Duncan, J.M. (1996). State-of-the-art: Limit equilibrium and finite element analysis of slopes. Journal of Geotechnical Engineering, 122(7), 577-596.
Duncan, J.M., & Wright, S.G. (2005). Soil Strength and Slope Stability. John Wiley & Sons.
Dyson, A.P., & Tolooiyan, A. (2018). Comparative approaches to probabilistic finite element methods for slope stability analysis. Innovative Infrastructure Solutions, 3(1), 1-11.
Griffiths, D.V., & Lane, P.A. (1999). Slope stability analysis by finite elements. Géotechnique, 49(3), 387-403.
Itasca Consulting Group. (2019). FLAC — Fast Lagrangian Analysis of Continua, Version 8.1, User's Guide. Itasca Consulting Group, Inc., Minneapolis, Minnesota.
Matsui, T., & San, K.C. (1992). Finite element slope stability analysis by shear strength reduction technique. Soils and Foundations, 32(1), 59-70.
Smith, I.M., & Griffiths, D.V. (2004). Programming the Finite Element Method (4th ed.). John Wiley & Sons.
Sun, G., Lin, S., Jiang, W., & Yang, Y. (2021). A simplified solution for determining the factor of safety of a slope reinforced with piles based on the shear strength reduction method. Bulletin of Engineering Geology and the Environment, 80, 7719-7730.
Zheng, H., Liu, D.F., & Li, C.G. (2005). Slope stability analysis based on elasto‐plastic finite element method. International Journal for Numerical Methods in Engineering, 64(14), 1871-1888.